Showing posts with label knobs. Show all posts

Sunday, March 24, 2013

Karli's Kitchen Makeover: Part Three

This post will round out the series about how we made over our 1980's dark, dated kitchen. (Read Part One and Part Two)

We did this all on a budget, but I still think it looks really great. We didn't move any walls or change the location of any appliances. Basically we left the footprint the same, but updated everything.

Part Two left off with the new countertops and subway tile backsplash installed. This post shows all the finishing touches that make me really fall in love with the space.


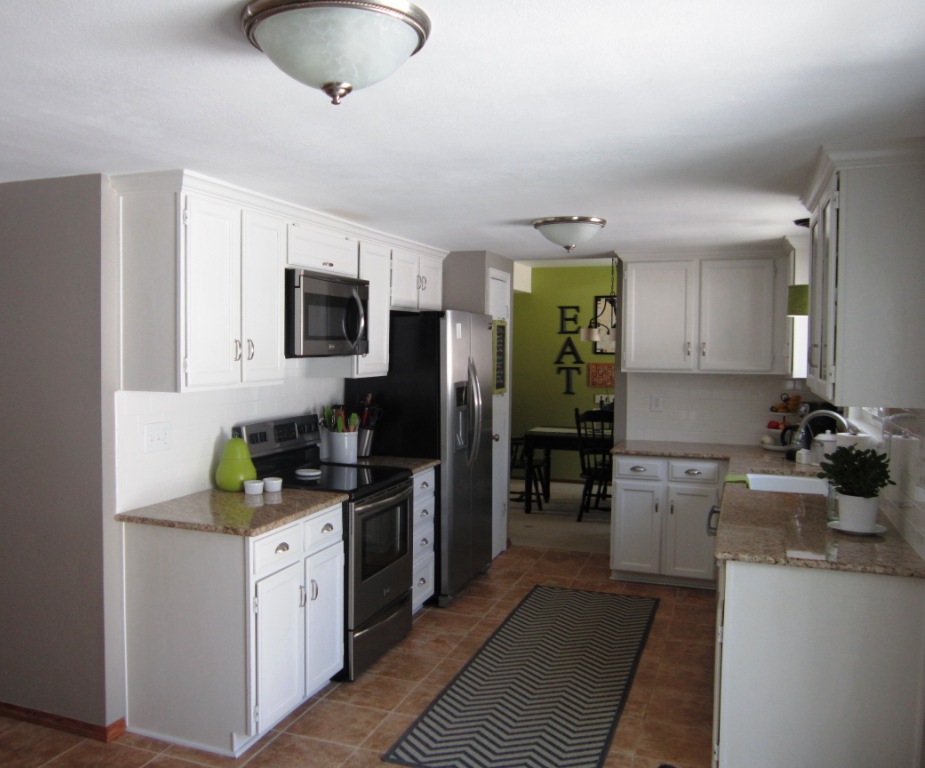
The space is so bright and clean looking now. The runner is from Ballard. It's indoor/outdoor, which is perfect for a kitchen space. We can wipe up spills with water or take it outside to hose off if it were to get that dirty.


That light from Ballard is genius. There was a pot light there. This new light has a pot light adapter for installation that took me 2 minutes. The shades come in different colors. Mom sewed that little valance for me from an extra curatin I bought from Z Gallerie to match the sliding door. 
 

The green accents in the kitchen really play off the green walls in the adjacent dining room.


We swapped out the fridge the previous owner had just purchased. Lowe's basically took that fridge back and gave us full credit, which we applied to this counter-depth side by side. I felt it was important that the fridge not stick out into the space (which was already a bit narrow).


We moved the table off to the side for easy access to the back door.


All the little touches are what make me so happy. This pear lived in my grandmother's kitchen and was filled with sugar. I never met her, but I think I got some of her cooking/baking genes.


The pulls on the drawers took a lot of mental effort (long story). So happy with how they turned out.


I like having something "alive" in most of our rooms. This little "money tree" plant came from IKEA. The cool glass milk bottle came from TJ Maxx Home Goods.


I think I mentioned this in the last post, but we had the wood taken out of these upper cabinet doors and I picked a seeded glass insert. We keep all our white dishes, servings bowls and special "good luck" mason jar (used at our wedding) in here.  


A view of the entire room as we live with it daily. What a happy space!
 

And because you know I love side by side comparisions, here you go.

This room took priority when we first moved in. I spend so much time in the kitchen between cooking dinner nearly every night (yes I really do that) and making special treats. We also love to entertain and people ALWAYS congregate in the kitchen. I wanted the space to reflect us: inviting, comforting, bright, cheerful. I think it accomplishes that. So we consider it finished...for now. 

~Karli  

Saturday, February 9, 2013

Kandy's Upstairs Hall Makeover Project

The Upstairs Hall project actually started with the simple $1.00 Thrift Store fix on the ugly little light (see the light fixture post). That led to repainting the hall ceiling (flat white) which brightened up the area. But--there is always a "but"--in the process, I had started painting the trim in the guest bedroom which led to painting the doors, etc. To make a long story short...The Upstairs Hall now needed work to be up to par.

The woodwork and doors were stained, hollow-core, builder basic. 

I lightly sanded all the woodwork and doors, removed the door knobs, wiped everything down and then put a coat of primer on. I used my favorite, Zinsser Bulls Eye 1.2.3. Primer. I then applied two coats of Sherwin Williams Extra White to the doors and wood trim.

The doors get the white treatment
I would have loved to replace all the baseboards with new wide white ones, but this project was supposed to be low cost, so instead I painted my baseboards the same color as my walls, Sherwin Williams Camelback. It basically made them disappear and not call attention to the old carpeting (which is another story).

I also would also have loved to purchase all new Oil Rubbed Bronze doorknobs, but again, I took the DIY route. After removing them from the doors, I sanded them with medium grade steel wool. I sprayed them with Krylon Primer in Ruddy Brown. After that was dry, I sprayed them with two coats of Krylon Brushed Metallic Oil Rubbed Bronze in Satin.


Here is one door knob before

Simply the easiest and best spray paint for Oil Rubbed Bronze

The finished door knob

The linen closet door got an old antique door knob plate with the same paint treatment.


I had a salvaged piece of trim that I painted black and added above the closet just for interest.


Karli thinks this looks like a mustache!
Then I had to add a little lock and key decor.

All this work made the rest of hall look like it needed a little sprucing up too.

The before (notice the gold frame)

I spray painted the antique mirror frame Krylon Flat Black, followed with MinWax Spray Polyurethane in Semi Gloss.


I was testing some pictures in that skinny frame--trying to decide what I want in there.

I also painted the mats in these pictures and rehung them. The mats had been an antique ivory and they needed to match all the other white.

The bathroom door (down the hall) got some fun plastic molding glued on it (I used Liquid Nails). I found the molding at a flea market and thought it was a great "girly" detail for my bathroom.


Since I like the idea of running a Bed and Breakfast, and I also think a touch of whimsy is fun, I added a quirky detail to the three bedroom doors. I bought three simple black frames, printed off numbers on my computer and attached them to the doors using Command fasteners. The fasteners can easily be removed if the next owners don't like the idea!!

Close up of the "hotel room numbers"

We now have Rooms 201, 202, and 203. There is no confusion as to which upstairs room I am talking about. I haven't labeled the Linen Closet yet, (maybe maid's supplies)?
  
Since the hall project is complete, I really need to start freshening up Room 203. That comes next. I'm never done.

~Kandy

Thursday, February 7, 2013

Kandy's First Closet Door Makeover

My closet project began simply enough...a makeover for the 1970's bifold closet doors in the guest bedroom (Karli's old room that I decorated Black and White French Country). It quickly spiralled out of control and I found myself repainting the entire room: the trim, the baseboards, the walls, the ceiling, and oh yeah, those closet doors.

Here is what started the whole thing...the stained hollow-core bifold doors.


After removing the bifold doors, I primed and painted all the woodwork around the closet in Sherwin Williams Extra White. I had some old louvered doors in the garage (I used these as dividers at the Antique Store) so I brought them in to see which I liked best...black or white.


I knew I wanted to add a little charm to the old bifold doors. I decided applying some wood trim would be just the solution, so off to the lumber yard with measurements in hand. I wanted the finished frame on each to measure 9 3/4 "  x   54". I bought four pieces, each 12 feet long and had the lumber yard cut each one in half (6') so I could fit them in my vehicle. 

My husband loves to get involved with projects like this so I had help. We used both saws, the radial arm and the miter box to cut the angles on our trim pieces.
This radial arm saw was a Christmas present one year.
We also used the miter box to make our cuts.

Remember to be consistent in measuring the longest point to make your 45 degree angle.
We created a stop (wood block clamped on our saw) to make sure all of our repeating cut lengths remained the same. We had 8 long lengths and 8 short lengths for the 4 doors. 

I lightly sanded the closet doors and all trim pieces as well. Then it was a matter of gluing all the trim on (and clamping them in place until dry). We used wood glue at first, but it was taking too long to dry so we changed to Liquid Nails and got along quicker. The pieces didn't slide around as much either.
Work in progress as the trim is applied (keep measuring and stay square)

After the trim pieces were all attached and dry, I filled in with putty where needed (filling in any angle boo boos). I then primed the doors, followed by a coat of the final color decision (black!). I had some antique glass door knobs that I had always wanted to use and these doors were just screaming for a little "bling." Of course the glass knobs had old paint on them so I had to remove that first (paint stripper, steel wool, and elbow grease).
The antique glass knobs were perfect.
This hook hangs by the closet and compliments the glass knobs...continuing the "bling."


Rehanging these doors is always a 2-man job and then you usually have to touch up your paint...just like I did. But, finally rehung...viola!!!!
The finished closet doors.


I am happy with the way this project turned out, in fact, so happy that I am continuing.  Did I mention that I have three more sets of these closet doors in my home? Oh my!!

~Kandy

Wednesday, January 23, 2013

From Trash to Treasure...Salvaged Closet Becomes Entertainment Armoire

I don't know if I am all alone out there, but, I really don't like the T.V., speakers and electronics to be the main focal point of my living room. Of course, it is "in style" now to have the big screen exposed and husbands are especially proud to show theirs off!!!  Nevertheless, I prefer all of that stuff to be hidden away. You see, my husband plays an electric bass guitar (was in a rock band in a previous life) and has a large bass amplifer as well as speakers and an assortment of components. 

The above reasons lead me on a search for the perfect, huge entertainment center which could accomodate and conceal all of the pre-mentioned items. For years I searched but to no avail. I knew with my husband's help we could probably build it, but I really wanted something older with character. Finally I found what I believed to be the perfect piece...an old beadboard closet salvaged from the dump. It was outside leaning against the wall of an Antique Store. It had great bones, great crown moulding on the top, and the right measurements to accomodate all that stuff. It came out of a home in the area, probably around the 1920's. I knew we could make it work...we only had to "tweak" on it.

It was a closet, made of fir beadboard and had a center support, a rod inside and two doors. It was a little wobbly but we were able to remove the center support and widen one door by adding a piece of wood trim so the doors would meet. We replaced the hinges and added old door knobs and plates.

I don't have a before picture. I wasn't thinking about ever wanting to see it in that shape again, but this shows the hinges and old door knobs we added.


We also added square wood feet that I ordered from VanDykes Catalog. We built shelves to accomodate the components, amp and speakers and made drawers to house the CD collection.

Just look at all this storage....


We made drawers to house the CD collection.


Since the closet had never been painted, refinishing was a snap...after sanding and cleaning the old wood I applied a coat of Briwax in Tudor BrownWith the doors closed, the old closet gives you no clue as to what it holds.


Getting this huge beast up stairs to our living room was no small feat (we had to get the help of two strong male friends, plus me and hubby). After all the trouble, we decided this piece will never leave...it will be sold with the house.

This project just shows what thinking outside the box (or closet) can get you!!!

~Kandy