Showing posts with label closet. Show all posts

Sunday, January 18, 2015

Shop Your Closet 1.18.15

I love Instagram. I've found so many great fashion and style bloggers to follow. One of them was posting pictures of outfits that she was "re-styling" as part of a #ShopYourCloset2015 challenge.

I figured I could join in, with an added twist. I'm going to take an item from my closet and style it four different ways. This way I can stretch the use of each item I invest in.

For this post, I just set out two separate outfits, which I'm planning to take with me to our Annual Convention in San Antonio. I'll be around all my favorite cowboys, cowgirls and ranchers, so what better time to rock the boots?!

 
I love this army green jacket. I wear it A LOT! I've found it to be very versatile and its seen me through several different sizes. I can wear it loose and open or belted and buttoned. I think I bought it at K-Mart when I was in college. You guys, that was 12 years ago now. If that's not a classic piece, I don't know what is!

 
The shirt underneath is a purchase I made this year. I found it at TJ Maxx. The sleeves are capped, which look terrible on me, so I always have to wear something under or over it. But the beading on the neckline is beautiful!


Since there is so much going on with the neckline, I'll add some fairly simple earrings, but I'll bling it up with stacked bracelets and fun rings.

Jacket (Similar), Shirt (Similar), Skirt (Piperlime Similar), Boots (Ariat similar), Earrings (Stella & Dot discontinued), Chevron Ring (Stella & Dot), Large Silver Ring (Silpada), Simple Silver Bangle (a gift), Renegade Stretch Bracelet (Stella & Dot), Chain Bracelet (Loren Hope), Black Leather Wrap Bracelet (Similar)


The next outfit is less cowgirl, but still borders on casual/dressy. I may set it aside for a dinner out with our team during the convention.

 
I bought these eggplant jeans on a whim and I've gotten so much use out of them. Surprisingly this color goes with so many items in my closet. They are skinnies, which I like to roll up and pair with this season's "it" booties.


Because this sort of neckline is not the most flattering on me, I need to add long pendant necklaces like this great one from Stella & Dot. It elongates my upper body in just the right way.

Sweater with Shirttail (StitchFix), Jeans (KUT from Nordstrom Rack), Boots (DSW last year), Earrings (Stella & Dot discontinued), Rebel Pendant (Stella & Dot), Renegade Stretch Bracelet (Stella & Dot), Chain Bracelet (Loren Hope), Vintage Crystal Bracelet (Stella & Dot)

I'll share my "Shop Your Closet 2015" outfits in upcoming posts.

I hope you all had a great weekend. And if you need to do a little bit of Stella & Dot shopping, you can take part in my Mystery Hostess Online Trunk Show. For every $25 you spend, you'll get an entry into the drawing to win all of the hostess rewards (usually about $250!!)

Cheers,
Karli

Tuesday, July 9, 2013

One Shirt, Five Ways: My Favorite StitchFix Top

In a previous post I mentioned how much I love StitchFix--an online retailer who assigns me a stylist to shop for fun a unique clothing. In my very first "fix" I received a shirt I never would have thought would look good on me. They proved me wrong.
It is a slightly sheer fabric, so I have to wear a cami underneath. And you're not seeing things, it is cut shorter in the front and longer in the back.
 
Not only did they prove me wrong, but this shirt has become one of my very favorite pieces of clothing. It's full of colors that are easy to mix with, it's comfy, it has great details and the cut is so versatile!

 Up-close so you can see the colors, light material and detail at the neckline.

I decided it would be fun to do a few posts about how I change up the items in my closet and get lots of good out of them--especially with something as trendy as this top. If you're going to buy something that's "hot" one season, you'll want to make sure you get your money's worth. (It may be "not" next season!) 


Style #1: Business Casual Office Wear
I've actually worn this outfit to the office a few times and to a meeting. It's comfortable, yet stylish while looking professional. I simply throw on my black leggings, a black cami, then the top, a bright orange cardigan and my go-to reddish orange ballet flats. I kept the jewelry simple, so just some woven black earrings.
Daytime office wear

Style #2: Casual Friday
I also like to wear the shirt on the outside of skinny jeans. Since the top is long and loose, I feel like I need to keep the bottoms rather slender. I paired this with my "I can't believe I just found this on sale" leather jacket, brown riding boots, a tomato red textured scarf and some large silver earrings.
I like that this could transition to a Friday casual date night too

Style #3: Saturday in the Park (I think it was the 4th of July)--sorry couldn't resist finishing the lyric
In this case, I tucked the shirt in and bloused it out a bit with my black Bermuda shorts. I added some sandals and lots of silver jewelry.

A skinny colorful belt might be nice here too, but since I bloused the shirt, I didn't feel like it needed one.

Style #4: Dressy Date Night
I feel really put together when I wear something like this. Since we aren't really "dressy" people I think I've only worn this once. But it's still a good look! I tucked the shirt in smooth--not a lot of blousing this time--with a slim fit black skirt. I added a tan belt and tan wedge sandals. Since I wore a blue cami underneath, I punched up the color with bright blue woven earrings and an orange bangle.
My "I've got it all together" look

Style #5: Sunday Brunch
While we're being colorful, we may as well embrace it. In this case, I paired the shirt with my tomato red denim skinny cropped pants and kept the shirt on the outside since they're skinnies. To add another color to the mix, I wore my turquoise ballet flats and lots of turquoise jewelry.
Embrace the colors!
You might not have even noticed, but I didn't do any necklaces with this shirt. I'm sure you could, but I wanted to let the fun neckline speak for itself, so I just stuck with larger, statement earrings instead. With my short hair, I also think the earrings keep it looking feminine.

I hope you enjoyed this post. It was really fun to put together. I'm already scheming a few more soon (maybe my mustard yellow cropped pants--who knew those could be so versatile?)!

Karli

Saturday, July 6, 2013

Let Me Introduce You to StitchFix...

One day my friend Jenn let me in on a secret and I've never been the same since. It's called StitchFix. Prepare to be amazed at the brilliance of this company and what it can do for your wardrobe.

It starts out simply enough. You sign up for StitchFix by filling out a profile about your style. Are your clothes more classic and preppy or maybe romantic or bohemian? (They have pinterest boards and a blog if you're not sure what your style is.)

You answer questions HONESTLY about your size and body and how you like your clothes to fit. You can even decide how much you want to spend on each item. For example, I'll maybe spend $75 on a dress but I want shirts to be less than $50. Then you decide when you want your first "fix."

And you wait with baited breath for your package (free shipping, mind you!). StitchFix sends you five items based on your profile--a complete surprise! The beautiful packaging sets the stage for what's to come.
This shirt and silver cuff were from my second fix. Love that this shirt is so quirky, light and colorful!

You open your package and are greeted by a note from your stylist and each item comes with two ways to style it. I like to lay everything out on my bed and examine it so I can see the details.

Then the fun begins. You get to try everything on...in your own closet, with your own shoes, skirts, bras, jewelry. And you have three days to decide what you want to keep (meanwhile all that's been charged is a $20 styling fee--so no large amount already charged or necessary to return).
My third fix was around the fall/winter. I asked for a versatile blazer. And I fell in love with this vest too. I've gotten the good out of both of these items. Perfect for the office!
 
The details of the vest are wonderful. Black and white pattern with suede covered edging and buttons.
 
The blazer is made of forgiving, stretchy jersey. It feels like wearing your favorite t-shirt! And the details--the inside is navy and white striped. I love to turn the cuffs up so you can see this nice style!


Simply return what you don't want in the PRE-PAID package. (That $20 styling fee goes towards anything you keep)

Here's the MOST IMPORTANT part about StitchFix...fill out the questionnaire at the end of your experience so your stylist can learn why you did or did not like the items she sent you. I can vouch from experience that the more detailed and honest you are, the better your future "fixes" will be.

My most recent fix was the best yet! I loved every single item. (Sadly one dress they sent was just a bit too short on me, so I returned it)
My fourth and most recent haul. I asked for light-weight, flowy tops and boy did they deliver!

Another bonus? StitchFix sends me things I might not pick out myself. I never would have guessed this top would flatter me, but every time I wear it I get compliments.
This was from my first fix--the only item I kept. It is what they call a hi-low top. It's cut shorter in the front and longer in the back. I'm planning a post on how many different ways you can wear something like this. Stay tuned!
 
What I love about items I get from StitchFix...the attention to detail and special touches. Love this gathered neckline.

And frankly, I like unique clothes that I don't see on everyone else. But I don't have the time or money to shop small boutiques to find these cool items. Answer: StitchFix.

And the prices are comparable to any online retailer I've found who carries the same items.

Seriously in love with this company, the concept and now my stylist!

If you're feeling compelled enough to sign up, please consider using this link to my referral code.

You can thank me later,
Karli

Saturday, April 13, 2013

My Stylish Wardrobe Staples

The items I consider staples in my wardrobe might be a little different than some of you, but it struck me today how important these items are. I recently wore out my favorite shoes, found a hole in my black tank top and realized just how many things a good blazer goes with.

So here's a round up of the items I find myself wearing over and over again to create my sense of style.

1. Leopard flats
Now I know you may be thinking "Really, Karli? This is your number one item?" Yes, yes it is. I'm on my third pair if that tells you how often I wear leopard shoes. I find them very versatile, almost a neutral, and they give my outfits just the right amount of "funky." 
Product Image
I found these at Nordstrom Rack on sale! Hooray!

2. Colored tanks
I wear tank tops under lots of things...including my #3 item. Under cardigans, under deep v-neck shirts, or alone...these things are easy and versatile!
 
I usually get a variety of colors from Target.

3. Stretchy one or two button blazers
The reason I specify "stretchy" is because I find that I don't feel as restricted if the material is a softer, less stiff, fabric. I wear blazers with jeans and dress slacks. I wear them with skirts and I also put them on over dresses that might be too bare for work. I have so many colors, but I get the most use out of black, teal, gray jersey and gray pinstripe.
 
My friend Angie turned me on to Olivia Moon blazers from Nordstrom. I love the rouched sleeves--since I always want to push long sleeves up, these work perfect for me.
 4. Scarves
I would be embarrassed if I actually counted the number of scarves I own. I find that I can wear something rather plain, like a black dress, and easily switch it up with a scarf. Given that I look best in brighter jewel tones, the ones I wear the most are green, purple and orange/coral. Mom got me a great leopard scarf that I've worn a lot too (but not with my leopard flats---that's too matchy for me).

I don't own this scarf, but man I love it!
 5. Jeans
I love jeans. I wish I could wear them to work every day. I love that you can easily dress them up or down. I feel like I really could get by with just two pairs. One needs to be a dark wash, bootcut, long enough to wear with, well boots. The other pair needs to be a skinny jean to wear with flats, sandals or tucked into tall boots with a looser top. Easy.


My favorite bootcut jeans are from Lucky and Seven.

I also have Lucky skinny jeans
I just realized that the little shopping trip I had to the discount store today is helping me acheive my style resolutions for the year. How cool?!

What are the staples in your wardrobe?

~Karli

Sunday, March 10, 2013

A New Old Door for Karli's House

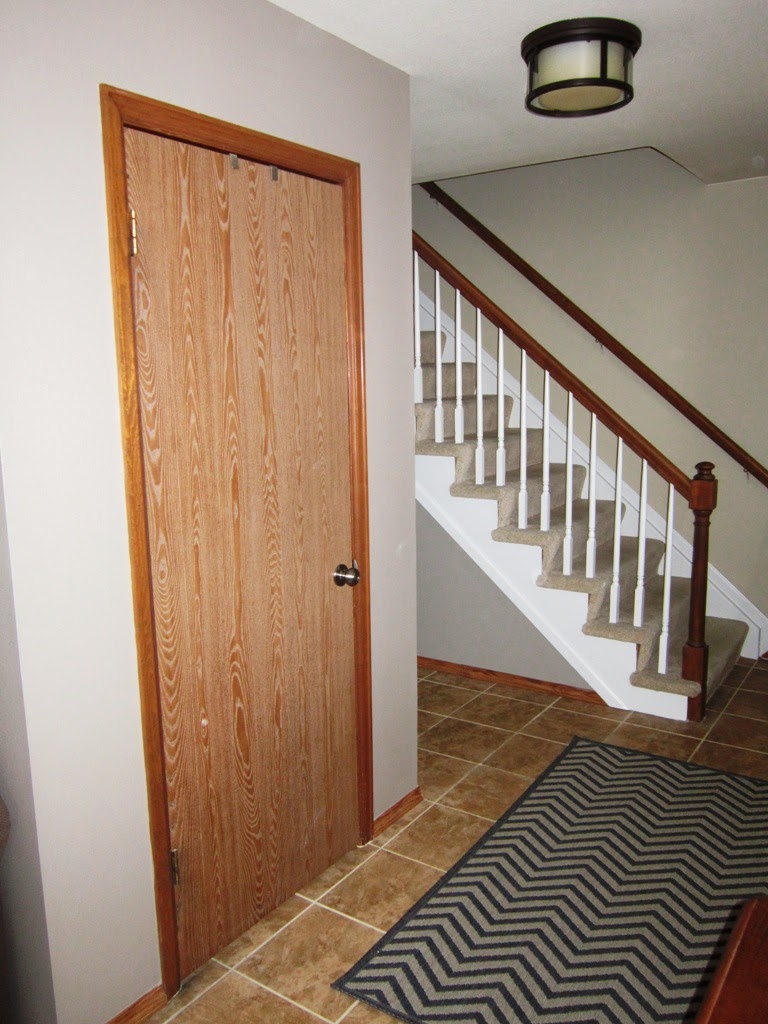
Karli has an entry closet just as you walk into her home. She has had several ideas for making over that area but because she's working on basically every room in their house, she hadn't gotten around to the door yet. 

Here it is...you can see it even took a blow on move-in day...

A close up of the damage
I found a great vintage door at a garage sale several years ago and it has resided in my garage ever since, just waiting for its purpose. I loved all the glass panes and it was already painted black. In one of Karli and my conversations, we discussed perhaps using it at her house. After measuring, we decided it came "close" to fitting. It was only 2 inches too short...that shouldn't be a problem, right?

Karli's Daddy helped with the project. We cut a 2x4 (a board that measures 2 inches in depth and 4 inches in height) to the same width as the door...29 3/4 inches. We cut off the top of it using the radial arm saw, squaring it up to fit the bottom of the door. We then glued it and clamped it to the bottom of the door.


We knew the door was now too long but we wanted to actually cut it off after we got to Karli's house. You know the old saying, measure twice, cut once. Well, that's what we did. Measurements taken over the phone can vary!!!

After the glue was dry, I lightly sanded the door and primed the new board on the bottom. Then we were ready to transport it to Karli's house along with the circular saw, tools and clamps.

When we got to Karli's we removed her old door and sized it up next to the vintage replacement. 
The vintage door is under Karli's closet door for the size-up

We got so lucky...the hinges lined up. The door knob catch was slightly off but we quickly fixed that with a wood chisel. We used the circular saw to cut 2 inches off of the board we had glued on to the bottom. We then drilled holes and reinforced that board with long wood screws. A test fit to make sure it was all a go...we used a small plane to shave off a little where it was rubbing. Then it was time for the fun stuff.

A test fit of the door with the additional piece on the bottom.

Shaving a little off
We could hardly wait to try out Krylon's Looking Glass Spray.We followed the advice from Pinterest and sprayed a mist of water on the glass before applying the Looking Glass. We put three light coats on the inside (or back) of the glass.

A good cleaning before we started spraying

This was just the first coat of Looking Glass, after the water spritz.
We were happy with the effect. It looked like old vintage mirror glass.

After that was dry, I cut squares of paper to lay on the glass, while I gave the back of the door two coats of black spray paint, Krylon Black Satin, followed by a coat of MinWax Semi-Gloss Polyurethane. We let that dry overnight, then turned the door over and repeated the paint process on the front. This time, we taped off the glass.


Finishing with Poly

An up-close of our taping and protecting

We could hardly wait until the next day when everything was dry. We attached the hinges and door knob and hung the "new old door." We were all thrilled with the results.
See another view of the before and after here.


~Kandy (and a little bit of Karli)

Saturday, February 9, 2013

Kandy's Upstairs Hall Makeover Project

The Upstairs Hall project actually started with the simple $1.00 Thrift Store fix on the ugly little light (see the light fixture post). That led to repainting the hall ceiling (flat white) which brightened up the area. But--there is always a "but"--in the process, I had started painting the trim in the guest bedroom which led to painting the doors, etc. To make a long story short...The Upstairs Hall now needed work to be up to par.

The woodwork and doors were stained, hollow-core, builder basic. 

I lightly sanded all the woodwork and doors, removed the door knobs, wiped everything down and then put a coat of primer on. I used my favorite, Zinsser Bulls Eye 1.2.3. Primer. I then applied two coats of Sherwin Williams Extra White to the doors and wood trim.

The doors get the white treatment
I would have loved to replace all the baseboards with new wide white ones, but this project was supposed to be low cost, so instead I painted my baseboards the same color as my walls, Sherwin Williams Camelback. It basically made them disappear and not call attention to the old carpeting (which is another story).

I also would also have loved to purchase all new Oil Rubbed Bronze doorknobs, but again, I took the DIY route. After removing them from the doors, I sanded them with medium grade steel wool. I sprayed them with Krylon Primer in Ruddy Brown. After that was dry, I sprayed them with two coats of Krylon Brushed Metallic Oil Rubbed Bronze in Satin.


Here is one door knob before

Simply the easiest and best spray paint for Oil Rubbed Bronze

The finished door knob

The linen closet door got an old antique door knob plate with the same paint treatment.


I had a salvaged piece of trim that I painted black and added above the closet just for interest.


Karli thinks this looks like a mustache!
Then I had to add a little lock and key decor.

All this work made the rest of hall look like it needed a little sprucing up too.

The before (notice the gold frame)

I spray painted the antique mirror frame Krylon Flat Black, followed with MinWax Spray Polyurethane in Semi Gloss.


I was testing some pictures in that skinny frame--trying to decide what I want in there.

I also painted the mats in these pictures and rehung them. The mats had been an antique ivory and they needed to match all the other white.

The bathroom door (down the hall) got some fun plastic molding glued on it (I used Liquid Nails). I found the molding at a flea market and thought it was a great "girly" detail for my bathroom.


Since I like the idea of running a Bed and Breakfast, and I also think a touch of whimsy is fun, I added a quirky detail to the three bedroom doors. I bought three simple black frames, printed off numbers on my computer and attached them to the doors using Command fasteners. The fasteners can easily be removed if the next owners don't like the idea!!

Close up of the "hotel room numbers"

We now have Rooms 201, 202, and 203. There is no confusion as to which upstairs room I am talking about. I haven't labeled the Linen Closet yet, (maybe maid's supplies)?
  
Since the hall project is complete, I really need to start freshening up Room 203. That comes next. I'm never done.

~Kandy