Showing posts with label makeover. Show all posts

Thursday, May 12, 2016

A Simple White Hutch

I should have known. Calling something "simple" in my mind, in my inventory system and to my family is the kiss of death.

I found a lovely, "simple" hutch a few months ago. It was obviously handmade. It had clean lines with a cute little curved board at the top. I was just sure this would be a great makeover!

The back had a handwritten note stating that it had been "lovingly refinished by XXX in 1994." That loving refinish was an orangish brown stain with a few drips in places. The loving refinish also included adding mirrors to the backboard of the top shelves. Oh, and new shiny brass hardware.

Maybe that was showing the piece TLC back in 1994, but today it called for paint! Also, the mirror had cracked at some point, so I was sure I could just smack it with a hammer and get all the pieces out. And the hardware---I'd reuse the ugly brass and simply paint it black.

Here's where my simple plan for a simple piece went downhill.

First, the mirror wouldn't shatter and I could NOT get it out! Next, I painted the hardware and put all the doors back in the exact same holes. But the doors weren't aligned and they wouldn't close!

This is where teamwork comes in handy. Mom and Dad were in town, so we put Dad to work on the alignment problem while Mom and I brainstormed how to handle the backboard.

After a few months, I'm happy to say I JUST finished this piece. I will be renaming it in my inventory list and on its price tag. It will now be "Shabby White Hutch."


The final hutch with a sweet gray and white trellis backboard.
 

I love how the pattern looks through the glass.


The reused hardware turned out great! It looks a bit old and worn.
 

I can just imagine sterling silver serving pieces, white ironstone dishes and wood bowls stacked in this hutch!
I'll be dropping this off at Unlisted in the next week!

Have a great week,
Karli

Sunday, February 8, 2015

Master Bathroom Renovation Update

I told you back in November about our plans to renovate our master bathroom.

Our contractor started on the project January 28th and they have made GREAT progress. It was so wonderful to see the demo stage! We had already pulled out the carpet and mirror, etc. But they got to tear down that silly wall!!


Look at the difference already! Let there be light...and SPACE.


Then it seemed to slow down a bit while they worked on rerouting plumbing, building a new wall and moving electrical. But now all that is done....


So this week they're starting all the tile work and before you know it, I'll be soaking in that slipper tub.
 
 
In the meantime I've been admiring the tile we picked and we had a blast exploring an architectural salvage warehouse where we found a special 1923 oak door from the Denver School Administration Building. It will be hung on barn door tracks as you enter the bathroom.


The process really has gone smoothly, with no major surprises. We're really happy with our contractor and the input they've provided.

The next images I show you will likely be the end result!

Karli

Monday, November 3, 2014

We're Going to Have a Master Bath!


It's  not like we didn't already have a master bath, it's just that it was in serious disrepair (beyond just being laid out in a completely odd way that wasted space.)


I knew from the day we saw this house that I wanted to reconfigure this space into a dreamy master bathroom. And those dreams are finally coming true!

We get to tear out that wall where the sink is, move plumbing, and install all new fixtures to boot. We already started the demo, so there's no turning back now.

Here is a sneak peek at our fixtures.

We started with tiles that we loved. The gray is the floor tile, the faux marble is going to be the shower walls and the surround for the tub area. The hex (which I seriously drool over!) will be a vertical accent stripe in the shower.


From there, we found a double vanity with a marble top on sale at Restoration Hardware. It has already been delivered so its just sitting in our bedroom, taking up space. :)


Finally, we just decided on our slipper tub!! I'm getting a slipper tub!!! Pinch me! We'll get this with black feet and polished nickel faucets.


Then its on to the little stuff that makes the space special. We'll hang this chandelier from Lowe's over the tub. Ahh, I can almost taste the relaxation.


And these mirrors from Pottery Barn were affordable and just the right size for what I want to do over the vanity.


I'll share progress with you as we kick into high gear. Right now, the last piece I need to find are the sconces. I know I'll find just the perfect thing soon!

Happy November!
Karli

Tuesday, May 6, 2014

Karli's New, Old Farm Table


Karli's birthday is coming up soon.  Almost every year she gets something homemade or refinished from Mom and Dad.  I guess it is just important to me that her gift is something made or remade with love.  This year will be no exception. 


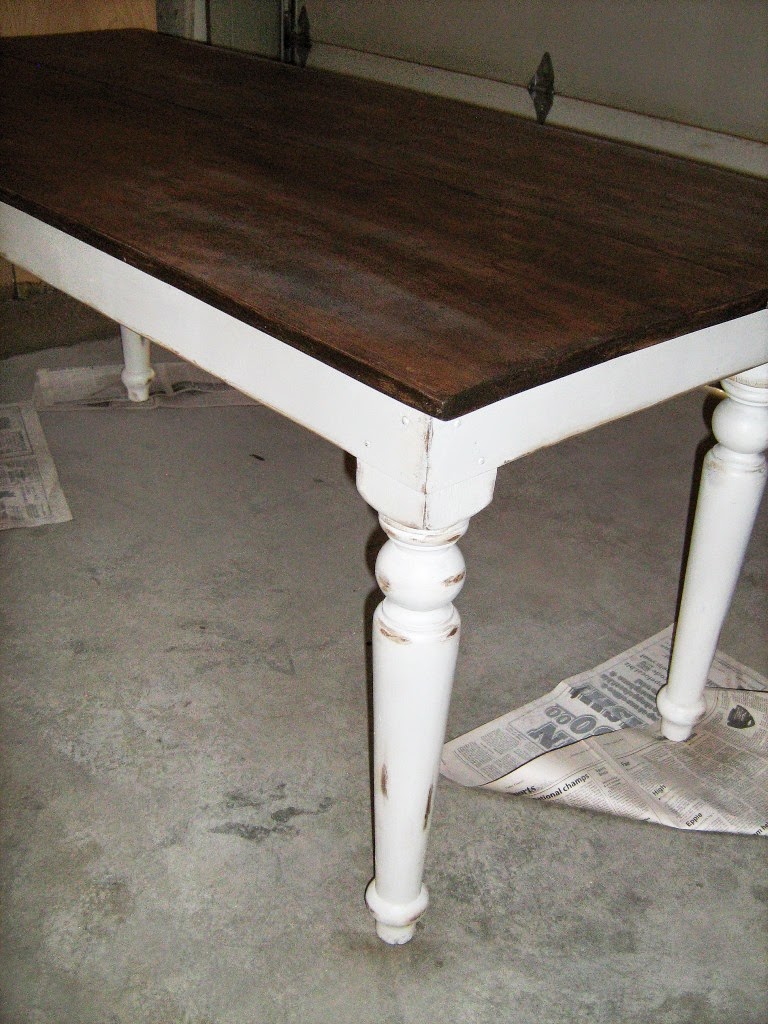
She is getting a New, Old Farm Table.  She has a dining table now.  In fact it is one I repainted for her ten ?? years ago.  It is black and still in good shape......she may be selling it.  She has been saying she wanted a larger one and she wants it to be white.  She also likes the look of distressed, recycled wood on top.  Great.....


I staged a house for resale last month and was partially paid with furniture.  One piece was an old farm table that had been in the owner's shed for years.  At one time the top
had been covered with oil cloth.  That had been removed, but the old tacks were still buried in the wood.  These had to be dug out.  And as if that wasn't bad enough, the top  had then been recovered with Contact Paper...........why do people do that?  The legs were dirty yellowed cream paint.  Other than that, it was in great shape.


I did not have great success trying to pull or scape off the old Contact Paper which had probably been on since the 1970's.  I ended up using the blow dryer to heat up the Contact Paper, making it pull up easier.  I still had to do quite a bit of scraping. 


Then I discovered underneath the Contact Paper that the top was painted the same yellowed cream.  Oh NO.....Karli wanted a dark wood top.  So out comes the stripper.
Did I mention that I love to STRIP!


This old table had been used for years as a "utility" table for craft projects, planting, and as a surface for small home repairs.  But, Karli said she wanted distressed.  Dwight kept asking when I was going to get out the big sander and wood putty.  I kept reminding him that this table had history and character, both of which would remain.  Karli and Brent wanted a table that could be abused, one that had that rustic feel, kind of a Pottery Barn look.


I did repaint the frame and old legs white, (Karli's choice now), but I distressed them. The top got stained dark, leaving some old paint down in the pits.  It then got 3 coats of Satin Polyurethane, (sanding with steel wool between coats.)   Here is what Karli's New Old Farm Table looks like now:


And here is Karli's New, Old Farm Table at her house.....


(She would like me to let you know that she'll do a full post with the final look of the room soon)
Happy Birthday Sweetheart!
Kandy

Monday, April 28, 2014

Going to Market (Painted Furniture For the Show)


Yes we finally get to take some of our great finds to market, The Paris Street Market, that is. We are thrilled to have been chosen to have a booth there on the first Saturday in August. I am working on some great fun things, so I'll give you a little peek!!!


These stools are hardwood, not very old yet really quite heavy and stable, but boring, so here is the before.........      


They got a new vibe with red paint and just for fun..........I added the numbers, so here is the after..............


This enamel top kitchen table is from the 1930's-40's. I had given it a coat of khaki earlier and it was OK, but WOW after having a coat of the same red! It makes a great set with the barstools.


I also had two twin vintage headboards. I forgot to take a before picture but they are just too cute in red!  I think they would be terrific in a kid's room. 


And remember, I still LOVE my White Shabby Chic stuff, so there will be several pieces painted white. Here is a twin headboard that I started with...


Love the distressed white paint on the headboard now. And to compliment the look, a few other white pieces, a shelf, and a coat hanger.


This chair and table got the White Shabby Chic distressing as well.  But, sorry, they are already SOLD. You just get to look at them so you can have a little "décor envy."


As the weather continues to improve, I'll be finding more pieces to share with you before we take them to Market! 

In fact, we are heading to Karli's soon and we'll be working on some pieces there too.


Later, Kandy

Thursday, January 9, 2014

Dining Room Conversion: Part One

Brent and I love to entertain at our house. We often have people over for dinners, bbqs, yard games, game nights and more. We had a need for a larger dining room, but didn't have the money to tear out walls. So one day I told Brent my plan and he thought I was a little crazy...

(Just for a reminder here are two pics of how the front room and dining room were set up)


My crazy plan...Convert the small-ish dining room into a sitting room/wine lounge. To do this, I moved the small loveseat from the front room under the wall of wine art. I also pulled in a small white coffee table, two side tables and two wonderful chairs I'd found a couple years ago at a flea market. I left the bar and hutch in the room.


I love the result! And since we've had the room arranged this way, people have already been sitting on the furniture. When those pieces were in the front room, they were NEVER used.

The room is cozy and comfortable now. It also feels more appropriate for the square footage in the room.


And it's just off the kitchen, so guest can sit in there and enjoy a glass of wine while I'm finishing up meal preparations.


Someday...in my dreams, I'd really love to make that window a set of french doors that open out onto a larger deck in the back yard. It would create really nice flow in and out of the house to the yard. Even better for hosting large gatherings.

For now, we'll enjoy this new lounging area.

And soon, I'll share what we did with our dining table, because I'm sure you're wondering where we're eating our meals now. :)

Karli

Wednesday, January 1, 2014

Powder Bath Reveal!

As promised, today I'm revealing our new main floor powder bath! I'm so excited to share the progression of this drab little bathroom.
 
It started like this. Tan, brown, builder-grade mirror and lighting. It also had a medicine cabinet on the small wall to the right of the sink. The floors were tan tile.
 
 
Some paint on the walls and cabinets, new cabinet hardware, a new mirror and towel rack, and the addition of some DIY paintings made the space look better.


We covered up the medicine cabinet hole with a painting.

 
And then, when it was time to get new floors on the main level, we just tore the entire thing out! It was liberating.


So, on to the big reveal after the new floors. Here was our inspiration post.
 
Love this new sign on the door that I found at an antique mall. People never knew which door was the bathroom. Now there's no question. :)


The hall where the bathroom lives looks so different now too!


When you open the door you're greeted with a brighter, clean looking room. I plan to change out the towel and a few other small items each season. For now, it's red for the recent Christmas season.
 
 
We need a bit of art to hang on the walls, but for now I'm loving the clean lines of the tall beadboard.
 
 
The vanity and sink are from IKEA. My dad helped me install it. I love how tall it is and how easy the sink is to clean. There's just something about a spotless white sink.
 
 
The vanity is awesome! The drawers are soft close, which I love. And the bottom one is tall enough to hold spray bottles, so all of our cleaning supplies live in here! I also love how it sits on little legs instead of on the floor. It looks like a piece of furniture now.
 
 
And that hole where the medicine cabinet was is now invisible. (Can I just point out that sink again?! Love that its all one piece!)
 
 
Here's another point of reference for where this bathroom lives in our house.
 
 
Just between the front door and kitchen. By the way, do you love that I painted all the trim bright white and the doors black?! I can't get over what a difference it makes in the house. It has a classy, timeless look. (And those new floors...are you kidding me?)
 
 
And another new piece that lives in that hall...
 
 
I found this at the antique mall too. It's a lovely pond with trees reflecting in the water. It makes me feel calm and serene. The black and white decor is really working in this part of the house.
 
Thanks for stopping by to see our latest makeover. Working on a home can be a slow, tedious process. But as we complete rooms and projects like this, it gives a huge sense of accomplishment. We did it!


All my best,
Karli