Showing posts with label diy. Show all posts

Thursday, July 24, 2014

My Heirloom Wedding Bouquet

I had this post planned from the moment we started this blog but finally got around to finishing it this week. When I got married I didn't consider wearing my mom's dress...I just tore it apart. With her permission of course!

My grandmother made my mom's wedding dress. And there's a rumor that some of the buttons were "stolen" from my aunt's dress, which my grandmother had also made. 


In an effort to include heirloom items in my wedding, my mom decided to let me use a sleeve/cuff from her dress to make the decorative holder for my bridal bouquet.

Here's the finished, beautiful product! It made my bouquet just that much more special.

(PS we purchased all the flowers for the wedding from Costco for a steal!)


Our wedding was photographed by A and A Photography. LOVE them!

Thanks Mom, for letting me "borrow" part of your dress for my special day.

~Karli

Thursday, June 12, 2014

Knocking out a wall


In all of my DIY and decorating and renovating our house, I've never gotten to take out a wall. But I want to.

So Brent and I are thinking about starting small. And by small, I mean a four foot long half wall. It's a silly little thing in between our kitchen and family room. Why it was ever there to begin with, I don't know. All the houses in our model had it.

Here are some pictures showing said wall...

During kitchen reno before we moved in

From the opposite angle looking into the family room


Last night at our HOA meeting (yes, we're both on the board. That's another story...), the house we met at was our model. They'd just taken their half wall out and it made a huge difference.

So the wheels in my mind start turning...and Brent started seeing the dollars fly.

But the good news is that the cost of this project is minimal...the bulk comes from having to move an air return that is housed in that half wall.

Now I just have to figure out what we'll do with the flooring at the transition. One thing always leads to another!

Stay busy,
Karli

Monday, May 5, 2014

Busy Birthday Weekend


***pic heavy post!***

This past weekend was a whirlwind! Mom and Dad came up to Denver for a visit. We were celebrating my birthday and Mother's Day a little bit early. Mom also brought several pieces of furniture to store in my garage prior to the Paris Street Market. Dad wanted to pour a step in our garage and I wanted to refinish a few pieces of furniture of my own. It was busy to say the least.

I'll do a full post on the furniture pieces but here's a bit more about the step. The step leading out to our garage from the house had a problem....the floor below it had sunk, so there was a REALLY LARGE drop. Brent and I were sort of used to it, but everyone who stepped down got a big surprise. So we needed to fix it!

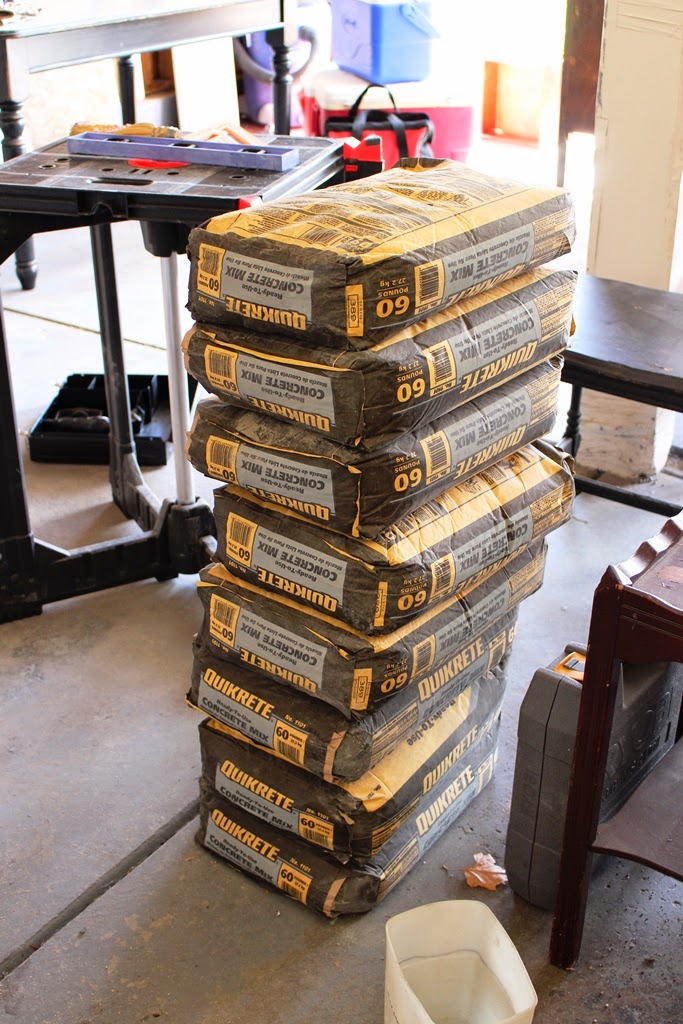
Eight bags of Quickcrete. Looked like a lot, but surprisingly we needed all but one of the bags.

 
My dad loves to study projects. He also loves to engineer ways to build things. He had been planning this for weeks.


Building the supports and the frame.


Here you can see the large drop off and the gap between the single step and the floor.

 
These were the ingenious supports Dad dreamed up for the frame. We needed something strong so the cement wouldn't just ooze out.


Some of the important tools. We were rocking and rolling at this point!


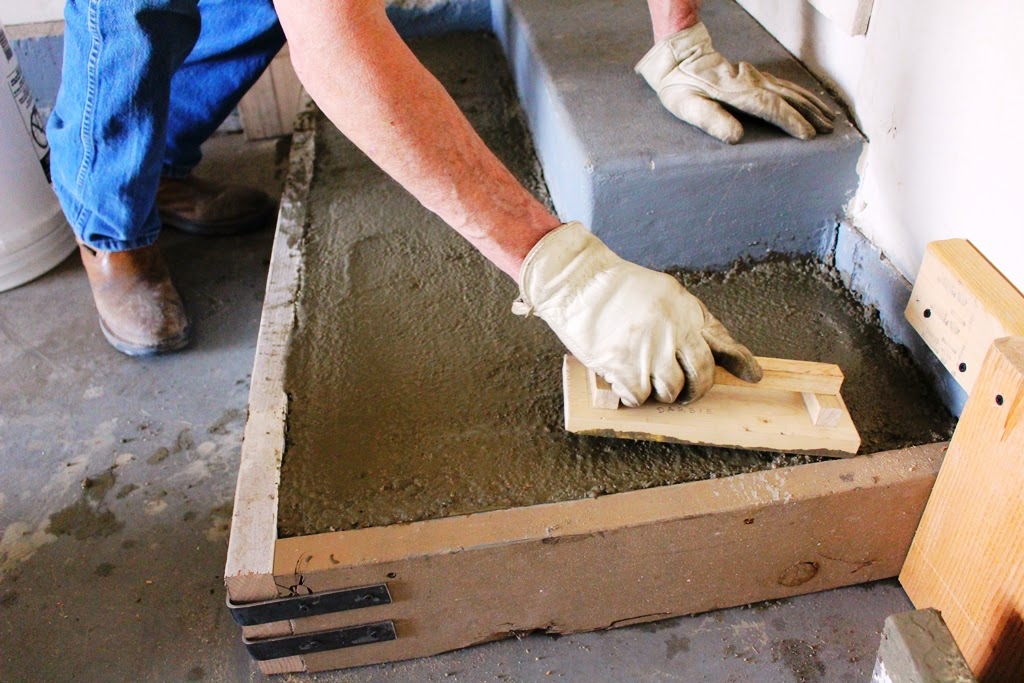
This was just a small part of the mixing process. Mom and I were the lucky ones who got to mix the Quickcrete and lug it over to the step. Dad took care of smoothing it out.


Working with Quickcrete was DUSTY. Thank goodness for masks.  


Here Dad is using a tool he built called a "darbie." It is very smooth and levels out all the concrete.


It is SO wonderful to have two easy steps into the house instead of one giant step.

PS...we tried to put Porter's paw print in the step, but we waited too long. It was too hard to make an imprint!


Saturday evening we went to one of my favorite local Italian restaurants to eat a glutinous meal. (Although Mom and I did share ours, so it wasn't quite as bad as it could have been!) Even if you don't like eggplant parmesan, I would dare you to try this one. It's been known to make converts of eggplant haters!


Sunday afternoon we smoked ribs and completed a few more projects. My dad proclaimed this would be his choice for a dying meal.


Now here's a little preview of the other pieces of furniture we refinished. I'll post more this week. I can't WAIT to show you how these turned out.


Hope you're having a great week!
Karli

Saturday, December 21, 2013

Powder Bath Makeover Progress

While we had all of our floors torn up on the main level we decided it was the perfect time to give our powder bath a makeover as well. It was very basic and a little boring before, even with our DIY canvas paintings, cabinet paint and new hardware, new lighting and a new mirror.

This is what it looked like for the last year and a half. Totally fine and useable, but I just wasn't wild about the low cabinet, weird counter top and the hole in the wall that we hid with a canvas. :)

 
There's a hole in the wall behind that small canvas.
So after we spent hours and hours tearing out the floors (and the cabinet and the toilet), we were left with this.


Once the floors were installed, Brent and I started executing the inspiration we had for the room. We hung beadboard, baseboards and trim pieces. The pics below don't have the final pieces of trim in.
 
 
Brent and my dad closed up that hole in the wall and then we simply ran the beadboard six feet up the wall so we didn't have to mud and re-texture.


Then with my sweet dad's help we got to work installing our new cabinet and sink. There was only one moment where we thought we might have to call "a real plumber" but in the end we did it all ourselves...no leaks!


I promise I do work on the house too, but I'm usually the one behind the camera catching other people in action.

I'll reveal the finished product next week, but here's one of my favorite sneak peeks. Before our floors were installed all the baseboards and doors were stained brown. Since the doors were off, I took the time to paint them all...BLACK and all the trim is white.


It was a lot of work but it was ALL worth it. I am in love with our main floor.

Karli

Monday, December 2, 2013

New Floors Finally Going In!

Two years of waiting and it's finally happening. Our main floor carpet and tile was torn out and we're getting our new "wood" floors. See the backstory here.


One week of time, lots of man hours, two bagster bags full of demo trash, thousands of staples and several sore muscles later...we had this.


Tearing out the carpet and the staples in the dining room and front room was a breeze compared to what we had ahead of us with the tile.

The layers went like this:
  1. Ceramic Tile
  2. Grout
  3. Tan brick vinyl
  4. Thin wood underlayment
  5. Thousands of tiny staples
  6. Tan vinyl
  7. Glue
  8. Thousands of tiny staples

SHOOT ME NOW!

 
Brent was not happy at this point
 
Pulling up the wood underlayment, exposing thousands of staples that we had to pull one by one

Thanks to my mom and dad for their hours of staple pulling and bathroom demo.


Porter was a huge "help"

At this point in the demo, we hosted Thanksgiving dinner. (I'm not kidding). Brent's sweet sister and her family joined us as we ate a wonderful dinner in the front room, with no furnishings and no flooring. We'll have fun memories of this Thanksgiving.


(Did I mention that we decided to tear out the powder bath too?!) We have a perfectly good cabinet and sink top if you're interested!
 
 
Empty powder bath as it stands now.

As I sit here this evening, I'm already marveling at how beautiful the new floor is looking. The installer is the nicest guy and he's doing great work.

I'm also really excited about what we decided to do in the powder bath!! 

Stay tuned for more progress pictures!
~Karli

Saturday, May 25, 2013

New Shades for the French Country Bedroom

It has been quite some time since I mentioned that I was going to remake and reuse some draperies in the French Country Bedroom, see the earlier post.  Well I am finally making that happen.  The repainting is all done.  There is no excuse now.
 
Really love the white window trim but we need
some draperies.
I had black and white toile draperies that had been in my bathroom.  I had purchased them at Target and still loved them.  They were perfect to reuse in the French Country Bedroom.  However, the draperies indicated dry clean only but, guess what....


Washing them in the washer on gentle, cold water, with Woolite worked just fine. 

         
I didn't put them in the dryer, just laid them flat to make sure they didn't shrink.  Then
I cut the two panels in half, making four panels with valances to fill the center.
      This just entailed cutting and hemming.
Loved them but it left a lot of wide open views for any guest who might be undressing at bedtime!
 
The draperies were on the "skimpy" side, since this was a make-do, make-over project, so I knew I had to fill in with additional curtains or something.  I had somewhat of a plan that I wanted to make shades out of black and white pillow ticking.  Years ago, I had purchased some of the ticking at Wal-Mart to cover the seat of this little stool. 
I had quite a time finding more of this ticking fabric.

I finally found the fabric like this online.  My plan on how to make the shades wasn't really concrete.  I had ordered yardage based on the size of my windows but I wasn't exactly sure what I was doing.  I bet nobody else does that!!
Here are my ponderings...
I had the pillow ticking fabric, curtain tiebacks that came with the toile draperies and available curtain rods.
 I sewed a pocket on both top and bottom and hemmed the sides.
The ticking fabric was 54" wide.  The small window was 47 1/2" wide, so I made that shade first.  I cut some of the fabric off to save for the big window which measures 65" wide.  Did I mention that I always pray when I make things without a concrete plan?  I definitely appreciate a little divine intervention!

I used the simple (cheap) valance curtain rod on the top and put the black metal rod on the bottom.  Having the round rod on the bottom of the shade allows me to roll it up .  Then I just had to figure out how to hold it in place after rolling it up!!!!
 I tried to reuse the curtain tiebacks but,
which way do I attach them and how?
The shades will probably be up most of the time and only lowered when we have company that would like some privacy or don't want to awaken at first light.  I decided reusing the tiebacks just wasn't going to work.  I made new tie-ups, flat ribbons of fabric, finished 3 inches wide.  I sewed Velcro strips on them to hold the shades at the desired height.  I also added a decorative black button.
This was Plan B.
The ribbon tie-ups, (or whatever you want to call them) are not fastened on so they can be moved or easily adjusted.
The big window.
The small window with the shade rolled up.
The small window with the shade down.
I even had enough fabric left-over to make a new pillowcase.
The French Country Bedroom is now ready for guests.  They can undress in privacy or sleep late if that is their desire.  But, they must remember.......


Glad this project is completed and I'm moving on to the next!
Kandy