Tuesday, December 31, 2013

Karli's 2013 Project Recap

As 2013 comes to a close, it struck me just how much we've done to our home in one year's time.

This was only the second year we've lived in this house and we've continued to create a cozy, welcoming home where we can entertain. We strive to do this on a budget while maintaining our sanity.

1. We started with the flooring in our office.


2. New windows were installed in the entire house. What a difference it makes in our energy bills! No more ice forming inside the house. 

3. Then we tackled the tile in our guest bath shower.


4. With help from mom and dad, we got a new old door for our entry closet.


5. We had several bushes, trees and stumps removed from our property.


6. After the bushes and stump were torn out in the front of the house, we had a new sidewalk poured.


7. During the summer we also planted a beautiful new front flower bed, had our exterior painted, installed new shutters and then took a deep breath!


8. We tore out the carpet and tile on our main floor and got new, beautiful floors installed.


9. While we had the main floor torn up, we have our main floor powder bath a makeover as well.


10. We also swapped the room where we have the dining table set up and we're loving it. Posts coming about that!

What a busy, amazing year it's been. We've been blessed to be able to do the work on this house and make it more efficient, comfortable and welcoming. (Is it sick that I'm already planning my list for 2014?!)

I hope 2014 treats you all well!

Karli

Monday, December 30, 2013

Winter Greetings and an Easy Chalkboard Sign

It is the 30th of December.  Christmas is now past and we are looking forward to a Bright New Year.  We awoke to this scene at our house this morning. I'll share our "Frosty Winter Wonderland."


I took down all the Christmas decorations and removed the wreath at the front door.  We needed a little Winter Greeting, so I created this chalkboard sign.  I had made this from an antique cupboard door.  I simply painted the inside panel with Chalkboard Paint.


Karli gave me this cool Chalkboard Marker for Christmas.  It was simply the best.  Forget using "real chalk"........this marker was wonderful.  It is a Wet Wipe Marker, called Chalk Ink.

I can look forward to changing this board with the seasons.  Karli has been doing this at her house and I loved the idea.

Happy New Year!
Kandy

Saturday, December 21, 2013

Powder Bath Makeover Progress

While we had all of our floors torn up on the main level we decided it was the perfect time to give our powder bath a makeover as well. It was very basic and a little boring before, even with our DIY canvas paintings, cabinet paint and new hardware, new lighting and a new mirror.

This is what it looked like for the last year and a half. Totally fine and useable, but I just wasn't wild about the low cabinet, weird counter top and the hole in the wall that we hid with a canvas. :)

 
There's a hole in the wall behind that small canvas.
So after we spent hours and hours tearing out the floors (and the cabinet and the toilet), we were left with this.


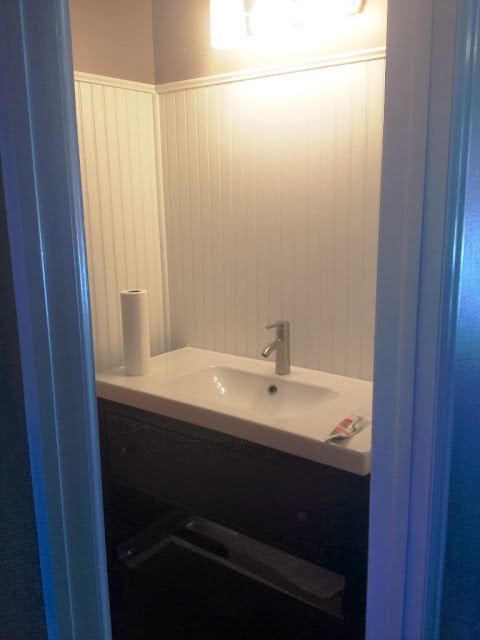
Once the floors were installed, Brent and I started executing the inspiration we had for the room. We hung beadboard, baseboards and trim pieces. The pics below don't have the final pieces of trim in.
 
 
Brent and my dad closed up that hole in the wall and then we simply ran the beadboard six feet up the wall so we didn't have to mud and re-texture.


Then with my sweet dad's help we got to work installing our new cabinet and sink. There was only one moment where we thought we might have to call "a real plumber" but in the end we did it all ourselves...no leaks!


I promise I do work on the house too, but I'm usually the one behind the camera catching other people in action.

I'll reveal the finished product next week, but here's one of my favorite sneak peeks. Before our floors were installed all the baseboards and doors were stained brown. Since the doors were off, I took the time to paint them all...BLACK and all the trim is white.


It was a lot of work but it was ALL worth it. I am in love with our main floor.

Karli

DIY Restoration Hardware Shelf

I have an order for a custom shelf to be given as a Christmas gift.  It will be going on a wall in a "manly" office area.  The lady who ordered it from me wanted a rustic, weathered look.  She said she had seen some she liked at Restoration Hardware.....she just didn't like the price.

Santa's elves....that means me and hubby......got to work.  I did a little drawing and planning and digging around out in the shop.  I came up with the perfect rusty old hinges and two rusty coat hooks.  I knew they would be perfect to make the Restoration Hardware knock-off shelf!

I have a limited supply of old barnwood, but I didn't have any good pieces as long as I needed for this project so off to the lumber yard.  I had to buy a new 1"x12" piece of pine.  We cut the board into two pieces, one 34" long and one 40" long.  We trimmed the 40" piece to measure 8 1/2" wide and left the other piece full width, 11 1/2".


New pine boards need a little "help" to look old and weathered.  I beat on them with a variety of tools....whatever is handy will work.


We predrilled and then screwed the top to the bottom.


We decided exactly where we wanted the hinges to be, marked and drilled the holes for the screws.  Two of the screws will be longer, allowing the shelf to be screwed to the wall.  We put it all together then took the hinges and hooks off so I could paint and distress the shelf.


I then did a paint process and a dry brush technique with leftover paint from my bedroom (flat finish gray) and a combination of acrylic craft paint (brown and black).


I used an angle brush, with only a little bit of paint on the brush.  I brushed in stripes, letting in feather out as I brushed the length of the board.  You don't want a glob of paint in one area.  You just keeping adding colors, blending until you like the looks of your work.


After the paint was dry to the touch, I sanded it with a sanding sponge and then applied a coat of stain with a sponge brush.  I let it soak in for a few minutes, then wiped it off with a soft cloth. 


After applying another coat of stain and wiping it again,  I let it dry overnight.

                     
Then a coat of clear Briwax, put the rusty old hinges and coat hooks back on and it's good to go................Imitation Restoration Hardware DIY Shelf.


Santa's Elves got done with time to spare.

Kandy

Friday, December 6, 2013

DIY Wine Cork Tray

I've been saving wine corks for several years now. To start my collection, I purchased several bags at a flea market one year. I do admit that I was, however, personally responsible for several of the corks in my collection.

I keep my corks displayed in old glass candy containers on wood shelves in my kitchen, (pictured here.)  Also see this earlier post on things to do with corks.


My cork collection seems to be growing so I decided to use up some of them. I've had this wood tray for several years and thought it would be perfect to fill with corks. I'd never been too crazy about the design painted on the bottom anyway.


My hubby helped me one evening.....this project was a little like a puzzle. The snow outside was deep....what else did we have to do. We laid out our corks in a  2 x 2 design (two up and two down) filling the space perfectly. 


I then glued each one down, one at a time, using Liquid Nails and weighted the entire tray down with books and those glass candy jars. I let it sit overnight.


Here is the completed project:


The tray can lay on a table or it can be hung on a wall. Since the holidays are here,
I'd really like to make more of these and give them as gifts, but I need more corks.............a perfect excuse for more wine drinking.

Kandy

Thursday, December 5, 2013

How will I get all this done in a week?!

Am I crazy? Why I do stack projects on top of projects? Because I'm crazy. Ok, so now that we've established that, here's the latest update on our flooring project. (It did just start as a flooring project, right?)

Our floors will be done in a couple days. My house is a wreck. The dog doesn't know where he can and can't walk and our family room and garage have been taken over by stray furniture and accessories.

Two things happened when we took everything out of the rooms on the main floor.

1)We tore out our powder bath vanity and toilet too. I wanted the new floors to run through the entire powder bath and they couldn't with the ugly old vanity in there. So it had to go. There was no other answer.

2) I decided I wanted a bigger dining room. But that's for another post.

3) I lied, three things happened. I decided to paint all the doors and door trim on the main floor too. Yet another post.


Back to the bathroom...There was also a lovely hole in the wall where they had a medicine cabinet. (Who puts a medicine cabinet in a powder bathroom?!) My dad and Brent patched that up beautifully so it isn't just a gaping hole anymore. BUT we were still going to need to do drywall repair and new texture to get the walls up to par. Or did we have to?!....
We hid that medicine cabinet hole with a canvas that we painted.

Answer: cover the walls in beadboard about six feet high. Seems too high you're saying to yourself. Nah...take a look at this inspiration.


Source
 
Source
While the sink and toilet are torn out, we'll put the beadboard up and paint it bright white. Then we'll put a new vanity and sink from IKEA in and reinstall the toilet.

Whew. All of that in the midst of moving furniture back into the main floor. It all needs to be done before next Friday when my wonderful family members arrive for the Cookie Exchange...when there will be 25+ guests in my house for the afternoon.

Like I said, we're crazy.---Or at least I am.

~Karli