Showing posts with label curtains. Show all posts

Sunday, September 15, 2013

The McOlson House: Design Boards

Yesterday was a fun day! Karli delivered Marie and Travis the design boards we put together for their main living areas. This included the front room/dining room, the kitchen space and the family room. Below you can see each room's design board with notes for the two fo them as they start to execute the plan.

While Karli was there, the placement of the furniture in the front room was adjusted and Marie sent me a message today saying that she's going to buy the paint right now.

Here's the front room design. The walls will be SW Accessible Beige and the ceilings will be white.

Marie's front room


A view of the room
 
The front room and dining room are open to one another, so they all need to be the same paint color. We also wanted to repeat the mustard/yellow accent by painting their side board and then hang that "inspiration piece" above. You will see that piece right as you walk in the house, so all the accent colors have been chosen to play off that.

The dining room view
 
 
Marie's Dining Room


Next up is the kitchen. They shared the floors they've chosen for the entry, kitchen and family room and we must have guessed correctly, because something very similar is represented below. We talked about painting their island SW Tricorn Black as shown below. Then potentially dropping three pendants. The eat-in kitchen will get a new light too. This whole space and the adjacent family room will be SW Functional Gray.

Kitchen view

Marie's kitchen


And finally, the room that presented the more challenging aspects of the entire project. The room is large and expansive. It also has a large wall that is calling for some art. The location of the TV required some creative thinking.
Family room view


So we've proposed two large square canvases hung vertically above the black console to draw the eye up. We also suggested adding a small bookcase under the TV, near to the stair railing to "ground" the TV. It should be painted the same color as the walls for balance.

We left lots of options for patterened curtains and rugs. We wanted them to be able to choose their favorite within their budget and timeframe. Their existing furniture will work in the room (rearraged ever so slightly) with potential additions of a chair (in an accent color like teal) and some transitional seating like poufs or cubes.

We also suggested that they paint the inset where the clock hangs over the fireplace a green. It will balance the two green canvases hung on the adjacent wall.  

Marie's family room


We really enjoyed putting these boards together and can't wait to see how it all comes together.

Kandy and Karli

Wednesday, September 11, 2013

New Curtains in the Office!

Today is my third wedding anniversary! Brent had a meeting this evening, so what do I do? I hung curtains, fixed the messed up closet doors and rearranged some artwork in the office.

This is all part of my New Year's resolution to get the office complete. (Yes, I am still working on that list)!

I ordered these from Target, so I could get them in the longer length. As I've said before, I like hanging curtains as high as possible. In this case, it really makes this room seem taller.


Porter decided he'd like to be in the pictures tonight. The curtains are still wrinkled too...
 

I also hung that picture over the desk tonight.
Don't mind the mess on the desk. This room isn't quite "photo ready" but will be soon.

More to come soon!
Karli

Saturday, September 7, 2013

The McOlson House: Making It Their Own

Meet Marie.

I was honored to have Marie as a beautiful bridesmaid during my wedding

I met her our freshman year of college. We were on the same floor in the dorms and soon decided we'd like to share off-campus housing once we were allowed to move out. We lived together for two years, in a tiny apartment and a rented single family house, so I had a pretty good idea about her style. She's one of those friends that you can pick right back up with, even if it's been months since you last talked.   

Marie and her husband Travis recently bought a house. She asked me to come over and give them some ideas on paint colors, layout, finishing touches, etc. I jumped at the chance! I spent a morning with the two of them, talking about pieces of furniture they had to keep, what we could change, what they like and don't like. Then I took pictures and measurements and started planning with mom. We did a lot of our brainstorming via a secret board on Pinterest. (Have you tried that? It's amazing!)

So here are the before photos of the space. Their biggest concern was the paint. The pale yellow is so not them. They want to add color, but aren't sure where or how much. So my goal is to add punches of color within a neutral palate.

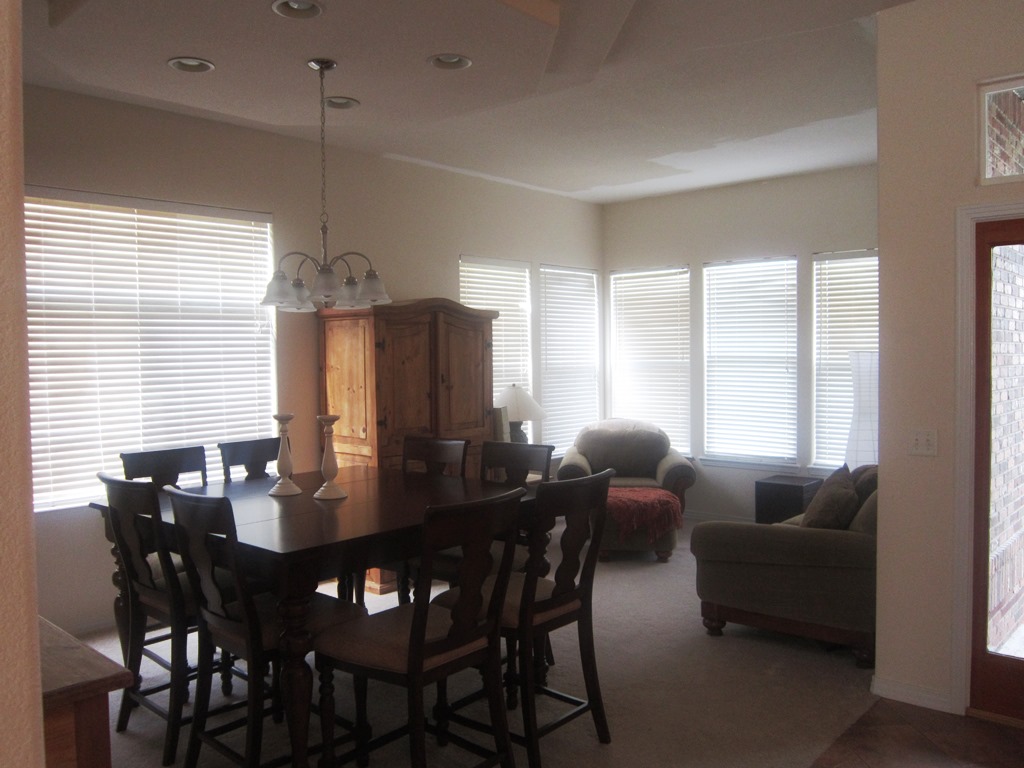
As you walk in the front door, this room is on your right. It's a dining room/formal sitting room. You can see that they started to paint the ceiling white, but it made the yellow-ish paint look worse. So right now that's on hold until we pick a paint color.
 
This is the couch (with a matching chair) in the front room. We'll work with this, just switching up the placement and pillows.
 
This is the dining room view. The table is cocktail height. The light fixture is change-able as well.
 
The next room you walk into is the open, spacious kitchen. The granite color is great. They don't love the tile floor or backsplash, so I'll come up with some ideas for that as well.
 
From the kitchen you can see into the family room, where they spend the majority of their time. We'll work with all the furniture in here. Paint, window treatments and some punches of color will finish this off nicely.
 
This is a piece of art Marie recently bought. I am actually using it as my inspiration for the pops of color I'll use in the entire space. I'm thinking of hanging it on a wall you see right when you walk in--a point of view where you can see all the rooms. It will all make sense from that vantage point.
 

Mom and I were putting finishing touches on our design boards this weekend. I'll present them to Marie and Travis and get their feedback so we can make any adjustments before they're considered final.

This is SO fun!

Stay tuned for more,
Karli

Saturday, May 25, 2013

New Shades for the French Country Bedroom

It has been quite some time since I mentioned that I was going to remake and reuse some draperies in the French Country Bedroom, see the earlier post.  Well I am finally making that happen.  The repainting is all done.  There is no excuse now.
 
Really love the white window trim but we need
some draperies.
I had black and white toile draperies that had been in my bathroom.  I had purchased them at Target and still loved them.  They were perfect to reuse in the French Country Bedroom.  However, the draperies indicated dry clean only but, guess what....


Washing them in the washer on gentle, cold water, with Woolite worked just fine. 

         
I didn't put them in the dryer, just laid them flat to make sure they didn't shrink.  Then
I cut the two panels in half, making four panels with valances to fill the center.
      This just entailed cutting and hemming.
Loved them but it left a lot of wide open views for any guest who might be undressing at bedtime!
 
The draperies were on the "skimpy" side, since this was a make-do, make-over project, so I knew I had to fill in with additional curtains or something.  I had somewhat of a plan that I wanted to make shades out of black and white pillow ticking.  Years ago, I had purchased some of the ticking at Wal-Mart to cover the seat of this little stool. 
I had quite a time finding more of this ticking fabric.

I finally found the fabric like this online.  My plan on how to make the shades wasn't really concrete.  I had ordered yardage based on the size of my windows but I wasn't exactly sure what I was doing.  I bet nobody else does that!!
Here are my ponderings...
I had the pillow ticking fabric, curtain tiebacks that came with the toile draperies and available curtain rods.
 I sewed a pocket on both top and bottom and hemmed the sides.
The ticking fabric was 54" wide.  The small window was 47 1/2" wide, so I made that shade first.  I cut some of the fabric off to save for the big window which measures 65" wide.  Did I mention that I always pray when I make things without a concrete plan?  I definitely appreciate a little divine intervention!

I used the simple (cheap) valance curtain rod on the top and put the black metal rod on the bottom.  Having the round rod on the bottom of the shade allows me to roll it up .  Then I just had to figure out how to hold it in place after rolling it up!!!!
 I tried to reuse the curtain tiebacks but,
which way do I attach them and how?
The shades will probably be up most of the time and only lowered when we have company that would like some privacy or don't want to awaken at first light.  I decided reusing the tiebacks just wasn't going to work.  I made new tie-ups, flat ribbons of fabric, finished 3 inches wide.  I sewed Velcro strips on them to hold the shades at the desired height.  I also added a decorative black button.
This was Plan B.
The ribbon tie-ups, (or whatever you want to call them) are not fastened on so they can be moved or easily adjusted.
The big window.
The small window with the shade rolled up.
The small window with the shade down.
I even had enough fabric left-over to make a new pillowcase.
The French Country Bedroom is now ready for guests.  They can undress in privacy or sleep late if that is their desire.  But, they must remember.......


Glad this project is completed and I'm moving on to the next!
Kandy

Wednesday, March 27, 2013

A Bathroom Makeover: New Curtains

The curtains in my bathroom have always been an issue. You can see by my photos that I have the tub area and the window all fighting for space. This part of my bathroom is quite small consisting of the tub, window, toilet (which you can't see), and even a doorway.

You can see some of the "issues" in these photos.

The window encroaches on the tub area

The tub area

I love tubs draped all the way to the ceiling and on both sides, but adequate lighting in my tub area becomes a problem. At one time I had black and white toile curtains here but that made the area seem even smaller and was a little busy with the granite on the vanity.

You can see the vanity and the black and white toile curtains, which I moved to the guest bedroom in this post. You can also see in this post that my granite has a lot "going on" with it's pattern.  
My solution for this area was to simplify, adding more white and creating a crisper, cleaner feeling. I found white patterned panels at Target. I got two, 84" in length, on sale for $17.99 each.
A close up of the fabric

I used one panel for the tub area, with a white shower liner behind it and only had to shorten the hem a little. I cut the other panel to create the valance for the window.  Since it was a little sheer, I lined up the fabric pattern, and folded the fabric in half to create my valance. This made both areas look similar.

In the tub area I used the shower tension rod, which I already had. I decided in order to get both window and tub rods to match, I had to simply use another tension rod. The only problem was when I found another one like mine at WalMart, the color didn't match. Not a big deal. A friend of mine had given me several packages of metal clips rings and curtain brackets that she didn't need. They were a copper bronze color that didn't match. Still not a big deal. Hubby hammered the metal brackets into the correct size, (1"). And then I just spray painted everything to match! 

I clipped all the curtain rings on to a hanger for easier spraying. I used Rust-oleum Hammered Black Spray Paint for everything.

This was an easy way to spray paint the rings
After all the paint was dry, it was a matter of hanging the "shower tension rod" turned "curtain rod" at the same height as the real "shower tension rod." Everything matches and looks pretty darn good.

The painted rod and clip rings

The two areas now look great! Like they belong together

I decided to add this vintage Victorian Frame above the tub area. I've had it for years just waiting for the perfect spot.
 
The old frame adds a fun touch of whimsy
   
And Voila!.......Bathroom Curtain project completed!

I love what adding more white to the room has done

The curtains go so well with the fluffy white towels
I'll do another post at a later date and describe how we made the bathroom vanity from an old buffet.......

The vanity area (a repurposed buffet) was updated a little bit in this makeover too. I moved the candles to complete my "simplify" plan.
Until then,
~Kandy

Thursday, March 7, 2013

Kandy's Master Bedroom Makeover, Part I

It is time to makeover our bedroom. It's looking tired, old, and a little heavy. (I could be describing more than just our bedroom!) Anyway, it is past time for a new look. I usually change things up about every 10 years or so. 

But, before I share the plan for changes, I thought you might get a chuckle out of where this room has been over the last 30 years.

In the 1980's it began as pure "Country."

Check out the waterbed
 
Check out the goose wallpaper border...if you couldn't sleep you could count geese.
In the 1990's, still Country, with more ruffles and Victorian touches. The walls had been painted hunter green. The accessories were burgundy and navy...believe me that was the "thing" back then. We had purchased a new oak bed and I had refinished the chest of drawers.

White bedding in the summer.

Navy bedding for winter....the ruffled shams and bedskirt remained the same.
 
The oak armoire is still in the room, just accessorized differently.

In 2000, the room got painted an olive green. I made the window valances, that in itself could be a new post. We also got a new comforter set and I made coordinating pillows.

The room in shades of green and khaki with a more monochomatic feel. (This must have been taken during the holiday season)
Then I had to make even more changes, the valances got recovered in a different fabric and I added fringe and changed out the bed pillows.


The brass lamps are antiques.This oak chest is a more recent refinishing project.
 
The valances


Probably need a new look here now. 

So, on to the plan for changes:
  • Repaint doors, trim and window trim white. 
  • Repaint ceiling and wood trim white.
  • Repaint walls a shade of gray.       (pick the perfect shade)
  • Purchase new white drum lampshades.     (probably at Target)
  • Purchase or make a white lumbar pillow for bed.  (to go in front of gold ones)
  • Purchase or make new art for over bed.
  • Recover oak chair seat in a gray pattern fabric.
  • Recover window valances, or uncover older fabric, or remove altogether???
I'm challenging myself to make these changes with very little money. Therefore, I'm keeping our old bedspread and all the furniture. I also need to change out some accessories...give the room a crisper, lighter, more modern touch.  

Anyway, I'm excited! When you live in the same house over 30 years, you have to keep changing it up or it gets as tired looking as its owner.

I'll keep you updated with the changes and transformation.
(See an update here)

~Kandy