Showing posts with label outdoor. Show all posts

Saturday, February 15, 2014

Saturday Shed Dreams


I blame my mom for this. Early this morning she sent me a pin from Pinterest of this...
Source

Now all I can think about is spring time and the fun plans we have for our beloved backyard.

First thing we want to do is get a shed. We really need to utilize the space in our garage more efficiently and right now lawn and garden tools (like the mower) are eating up precious space.

Here are a few inspirations I gathered on Pinterest this morning.

If we're dreaming big, I'd really love to be able to have a small greenhouse area within the shed for spring seedlings.

Source

The area of the yard where we're thinking about putting the shed is near the back of our brick fireplace. I think it might be fun to make it a secondary sitting area...maybe a little outdoor fire pit built around the back of the chimney??

Source
If we're being more realistic, then I bet we'll end up with something a bit more like these two. They are functional with just enough style. We can paint them to match the house and get some similar shingles. I really love the windows on each of these options. (Though I bet that will add cost, so who knows if we'll actually have the funds for that.)

Source unknown
 
Source unknown
And finally, I found this great source for information about the foundation. I think if we pour a concrete pad, then we have to get a permit and more approvals from the city. However, if we level and build a foundation like this one, I think we can avoid the permits.

Love this site for tips! Source 
More to come later in the spring!

~Karli

Friday, July 26, 2013

Karli's Exterior Project Done...For Now

Ok, so here it is! The big reveal of our exterior project. By now you know all about the tree projects, the trim projects, paint choices and flower bed plans. It all came together in something I am really proud to call ours!

After all the old evergreen shrubs and bushes were removed (and the giant cottonwood stump was ground out), we started planting flowers. Finally, the flower beds are making all that effort worth it! The flowers are blooming and spreading and, hopefully, growing strong roots. I picked mostly perennials so those beds won't require a ton of work to look great year after year. Here are a couple of progress pictures of the beds.

After the sidewalk was poured we had an even larger space to fill next to the driveway.

 
Earlier in the summer, this pic was taken before we put in edging bricks to define the bed. We also planted a couple more things on the left part of the bed.

We picked Sherwin Williams Pewter Tankard for the body and it is exactly what I wanted. While we were painting my sister and brother in law kept calling it brown. I called it gray. PERFECT. I wanted a gray that didn't turn blue or pink. I wanted it to be almost brown.
This shows that side flower bed filled in. The plants are still growing.

We used Sherwin Williams Extra White for the trim for a really nice crisp pop. And then I ordered black shutters from Home Depot, so we didn't even have to paint those.

And I got my lime green door!

The bench mom made looks amazing on the front porch. As do the black chairs I picked up earlier this summer.
Love that bench! You can also see the door better here too.

I can't wait till the flowers fill out a bit more. (And it will be nice when we re-sod the lawn next year)
Here's the full "after" view with the before picture too. What a difference!
We still have all that empty space where the tree stump was. You'll probably see more posts about that next spring!

Just a reminder of where we started. It was all worth it!

Friday, June 14, 2013

A Sneak Preview: Exterior Project (Almost) Complete

It's hard to believe it's been almost a month since my last post. Where did the time go? What have I been up to? (Eating bonbons and sun-bathing?--I WISH!) Let me tell you a story.

In my last post, I told you about our trim being rotted and needing replacement before paint could begin. I also told you that the work was going to begin the next day. Well, that "little" project turned into a not-so-little nightmare. The contractor we used was very late starting the work, very slow to get the "two day" project done and made a few mistakes along the way that delayed the project even more. It was all I could do not to rant on Facebook and complain on the blog, but my sweet husband kept me from it. (I still have to practice deep breathing when I think about it--and to be honest I did write a Facebook post about my frustrations and when I tried to post, my phone kept giving me an error message. I considered it a sign from God that I should remain positive.)

I don't want to bore you with all the nonsense, so I'll get to the happy stuff. Brent's sister and her husband paint houses on the side of their already full time jobs and lives. They painted our old house and I realized then that their attention to detail is just as strong as mine. Perfect. Needless to say, they did an amazing job on this house too. I almost cried when I pulled up the final evening and it was done.

A year's planning and saving resulted in something I'm proud to call my own!

Here's a sneak preview of a full blown post to come...


I don't think I'd even posted about this! We add a new sidewalk into the mix too. So happy with the results!
 
The first bit of paint going on the house! I was giddy like a little kid!
 
Lime Green front door?! I think YES!
 
Shutters going up (and that last bit of reddish brown trim)!
 
Here's just a little bit of the finished product. More coming in a couple days!

What do you think so far? Better than where we started? :)

Happy Summer,
Karli

Friday, May 24, 2013

Displaying Found Junk On A Patio Wall

You may remember in an earlier post the damage that was done to the roof of our garden shed when Dwight and I took down part of an aspen tree......well the weather has now improved so we decided to repair the damage that we caused.  We replaced a board and the roof shingles.  Fixing all of that meant that we needed to get to the inside walls of the shed, locating nails.  Needless to say, we found it necessary to empty the shed to get to those walls.

As we sorted through 30 years of stuff, I found some "junk" I had forgotten that I had.
It is all "family stuff" that I had hauled back from Oklahoma, knowing some day I would find a place for it.  Here is the saved stuff we uncovered in the shed.....

These are old cistern cups, used to bring water up out of a cistern or well. These were my Grandpa Ray's and had been used on the farm in Okla.
 
A rusty old saw blade and a gear.
                                     
These are a pair of rusty old hames, part of a harness which would have been used with horse drawn farm implements. These were Grandpa's too.
           
This is an old drawer front I found who knows where....... You can not see it but it has the letter "F" stamped on the front.
It will be great to hang BBQ stuff off of the handles, or not!!!

I hung all of this assorted "found junk" on the wall outside on the deck.  I already had the grapevine wreath hanging there, so I just incorporated it all for a unique display.
I bet I can truly say that no one else has a wall quite like ours!
           
I would love to add a pillow to the chair, but the squirrels have been known to destroy things on our deck.  I also need to re-stain the deck later when it gets a little warmer, but decorating this wall inspired me to look forward to spending time out here this summer. 

I want to try planting in the cistern cups, too......I think they would be great for succulent plants, like hens and chicks.  I have one more set of these that I'm saving for Karli.....she might want to do the same thing.  If nothing else, they are great conversation pieces!  Did you know what they were?

Happy Deck Time, Kandy

Wednesday, May 15, 2013

Exterior Trim Replacement and Paint Colors

While preparing to paint the exterior of our house, in addition to removing trees, we determined that most of the cedar trim was in total disrepair. Completely rotted and disintegrating. Awesome.

So we got a few estimates and the work to replace all the trim (including the four column posts on the front porch) begins tomorrow. I'm so excited. Almost as excited as I am for the day the painting will start.

We continue to apologize to neighbors as we see them. One was nice enough to say, "I like the new chairs you have on the front porch. Are you going to replace the shutters?" This makes me laugh a little bit. Thankfully it is almost over.

We decided on SW Pewter Tankard as the field color, SW Extra White as our trim color and we're purchasing black vinyl shutters from Home Depot (so we don't have to paint those). And the front door will likely be SW LeapFrog. You can see the original color dilemma post here.
We had a limey green front door at our old house (until the silly HOA decided they didn't like the color). I can't WAIT to have one again! Source
SW6431 Leapfrog

Sherwin Williams Pewter Tankard
And just to add to the fun, we're getting a new sidewalk on Saturday. I'll be sure to take before and after pictures.

Ahh, once that paint is done, I'll be so close to completing one of my New Year's Style Resolutions.

~Karli

Monday, April 22, 2013

Front Porch Chairs--Change of Plan

I reserve the right to change my mind.

I've been on the hunt for new seating for our front porch. It's a narrow slab of concrete, but it's long. I knew it would have to be a bench or two chairs placed side by side.

Since I'm getting a fabulous custom bench made from a "found" headboard as a birthday present (Mom and Dad are making this for me and I can't wait!) I decided to go with chairs.

So I had my mind set on two white rocking chairs like this...

 White Slat Patio Rocking Chair
Source: Home Depot
Cute, right? They'll go perfectly with our soon-to-be white trim. The problem was that:
a) I couldn't find them in white to sit in and "sample"
b) Even the ones we found in colors were uncomfortable once we sat in them

On Saturday night Brent and I walked into CostPlus to see what they had and we saw this beauty.

Plantation Chair from CostPlus.

Totally not white. Totally not a rocker. Totally comfortable and fabulous!

End of story. Two of them are now sitting on our front porch and they'll look even better once the exterior paint is done. Then I plan to add some accent pillows the same color as the front door. Anyone care to guess what color that will be?

~Karli

Wednesday, April 3, 2013

Bushes Out, Flowers In

Ok, so the flowers aren't literally "in" yet, but I placed my order for just what I wanted from Burpee.com. I signed up for their newsletter, so I got free shipping on the order. Based on our zone and last frost date, the plants will start shipping April 15th. Mom is headed up here for the weekend with some day lily bulbs that we'll put in the ground right away where the bushes lived along the back of the house.

And because the bushes are being torn out tomorrow (yippee), I'll have the perfect space for a beautiful new front flower garden.  I got my inspiration for the layout and style from BHG.com.

I thought, because I can hardly wait myself, that I'd share my final flower choices with you. All the photos are from Burpee's website.  

Oriental Poppy, Allegro
Poppy, Allegro
Probably one of my favorite flowers!

Spiderwort
Tradescantia, Blue & Gold
Noted as being good for novice gardeners. Sounds great!

Clematis, Jackmanii (this will grow up the mailbox post)
Clematis, Jackmanii (purple)
Sturdy climber and very hardy.

Echinacea/Coneflowers, Hot Summer
Echinacea, Hot Summer PP20687
This is a Burpee exclusive. Love the vibrant colors. Will be great to cut and bring inside!

Foxglove, Rose Shades
"Blooms like crazy. Needs no care at all"

Rudbeckia/Brown Eyed Susans, Goldsturm
Rudbeckia, Goldsturm
"Bright, bold and easy to grow"

Solidago, Fireworks
I'll plant this towards the back of the bed

Columbine, Lime Sorbet
These bloom lime and then turn white. I've never seen anything like them before!

Lisianthus, Florida Blue Landscape
Apparently these can tolerate lots of heat. Perfect for the front of our house. They're also supposed to be almost like roses--minus the thorns!
I still plan to purchase some annuals locally for planter boxes. I'll do sweet potato vine with purple wave petunias in those planters.

My sweet friend, Angie, volunteered to come over and help me plant. This is a fairly large undertaking, so you can bet I'll be taking her up on that!

Here's to finally having curb appeal at this house!

~Karli
Saturday, March 23, 2013

Spring Fever: Flowers on the Brain

Last night I dreamt about flowers. Beautiful hot pink geraniums, tall black eyed susans, showy ice plants, colorful columbines and hummingbirds. I think it's a sign...I've got serious spring fever. Figures. Today it has snowed about a foot.

Our backyard is amazing. We had no idea when we bought it in the middle of winter that it would be so marvelous come spring time.

Sadly we had to cut down that large cottonwood tree, but just look how beautiful this is!
I told you earlier this week about how we're tearing out overgrown trees and bushes up against the house so we can paint the exterior. I mentioned that I'm going to transplant some day lilies from Mom's house in the back where we're losing two large bushes. I think between those and what you can see going on in that picture above, the backyard will be colorful and alive. But the front...


Sorry for the fuzzy picture. It's from the MLS listing. I never took pictures with my camera because I'm embarrassed of it.
We don't have a lot of space in the front. So I feel like a little bit of work and some colorful flowers will go a long way. But there's a lot of work to do (including exterior paint) before I can start planting flowers.

There's a cottonwood stump in the middle of that brick circle thing. (I wish the previous owners would have had the stump ground when they cut it down--now we get to deal with it.) So we're planning to do that (getting rid of the brick circle and the wood chips too) plus removing all the juniper bushes and the three deciduous berry colored bushes.

We'll basically have a blank slate at that point, minus the sidewalk from the drive to the porch, which I think will have to go too. We want to "widen" the driveway where you currently see the juniper bush row. We'll do a nice paver row and the extend that up to the front door.

Love the look of this walkway. I think we could use it to extend the driveway about a foot on each side too. From Houzz.com

We'll probably just place new sod over the place where the tree stump is. Then I can start thinking about flowers.

The front of the house faces southwest and it takes a beating in the afternoon sun. PLUS we're going to be in drought restrictions again. So I need to be smart about what goes in the newly found space. After consulting Better Homes and Gardens website and magazine as well as absorbing all I can from a friend's gardening book collection, I have some pretty good ideas.

Here's the basic layout I'm going to follow with these plants. Gotta love Better Homes and Gardens! Their free garden plans provide the names of the plants, how many you need, where to plant them, etc. Sort of foolproof. (Heaven knows I could use THAT...I really know NOTHING about flower gardening) 

Low-Care Sidewalk Garden
"Low Care Sidewalk Garden" from BHG.com. (Sounds perfect!)
I can't wait to get started on the exterior. Finally our neighbors will start to see that we really do care about our house.

~Karli

Sunday, March 10, 2013

A Tree Project

When we were recently at Karli's house, we took out an overgrown ugly cedar tree that was overtaking the side of her garage. That little project got Karli's Dad in the mood for more "tree work." He loves to trim trees. He walks outside at our house and the trees start trembling with fear dreading the abuse they will suffer at his hand.

Anyway, when we got back home his focus became centered on the trees in his own backyard. One particular aspen tree came up in our flower bed several years ago. I wanted to let it grow...he didn't.

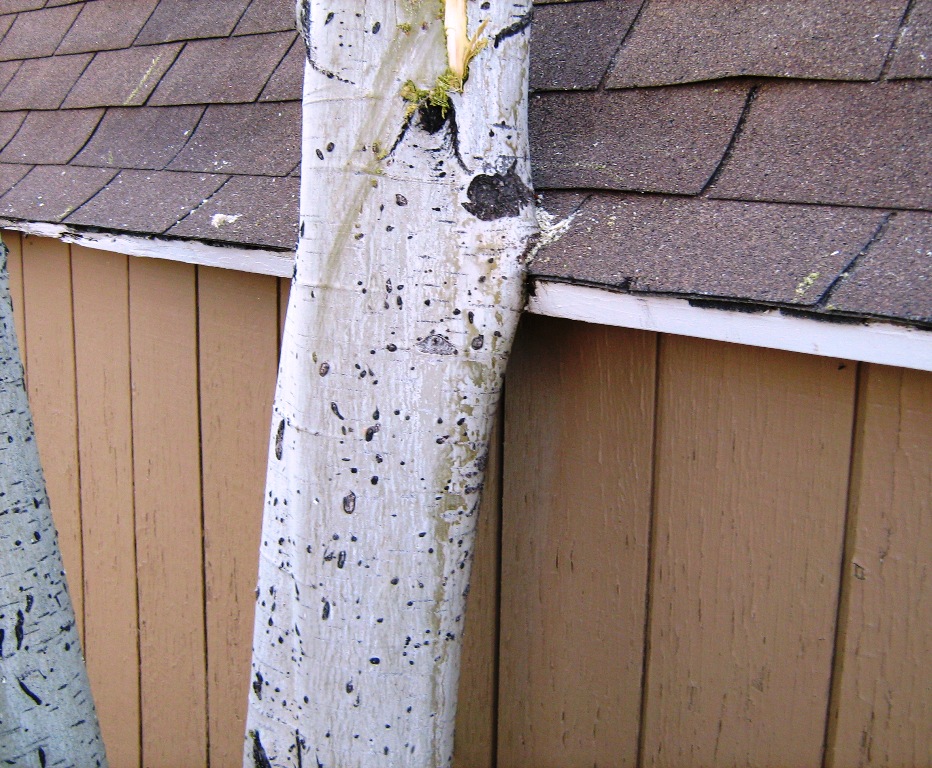
I won. It grew with three trunks and much to his dismay, it is encroaching (or rather attaching itself) to the roof of the garden shed. So, on this day, he decided it was causing too much damage to the shed. It was coming down!

You can see the trunk "growing" into the garden shed.
 After some severe trimming on Dwight's part with the bow saw while standing on the roof of the shed, he was ready to take it down. Because the tree was as tall as a 2-story house, he decided we should use a rope and persuade it to fall where we wanted. My job would be at the end of that rope, supposedly out of harm's way, applying constant pressure (pulling), while Dwight operated the chain saw. All went according to plan for a while. He had sawed over half way through the trunk. Then the chain saw blade went dull...apparently from all the sawing we had done at Karli's. He stopped sawing and told me to try just pulling the tree down. He didn't think I was doing enough, so he came to help pull. With two people on the end of that rope and a mighty pull.................the rope broke and Dwight landed on his butt. The tree was still standing.
Plan B........more power with the tractor.
On to Plan B. Replace the broken rope with a chain and replace me with a tractor. Well, to make a long story short. That worked! We did bring the tree down, but in doing so our tree caused even more damage to the shed than it was doing in the first place.
You'll see extensive damage to the shed.

Looks worse closer!

Here she lays until we can repair the chain saw.
I will mention that no animals or people were harmed during this project. The photographer only took pictures when the chain saw was not running and had her cell phone on her person at all times, ready to call 911 if necessary.

This blog site is not intended to promote business or advertising for D and K Tree Service!!!!

~Kandy