Saturday, May 25, 2013

New Shades for the French Country Bedroom

It has been quite some time since I mentioned that I was going to remake and reuse some draperies in the French Country Bedroom, see the earlier post.  Well I am finally making that happen.  The repainting is all done.  There is no excuse now.
 
Really love the white window trim but we need
some draperies.
I had black and white toile draperies that had been in my bathroom.  I had purchased them at Target and still loved them.  They were perfect to reuse in the French Country Bedroom.  However, the draperies indicated dry clean only but, guess what....


Washing them in the washer on gentle, cold water, with Woolite worked just fine. 

         
I didn't put them in the dryer, just laid them flat to make sure they didn't shrink.  Then
I cut the two panels in half, making four panels with valances to fill the center.
      This just entailed cutting and hemming.
Loved them but it left a lot of wide open views for any guest who might be undressing at bedtime!
 
The draperies were on the "skimpy" side, since this was a make-do, make-over project, so I knew I had to fill in with additional curtains or something.  I had somewhat of a plan that I wanted to make shades out of black and white pillow ticking.  Years ago, I had purchased some of the ticking at Wal-Mart to cover the seat of this little stool. 
I had quite a time finding more of this ticking fabric.

I finally found the fabric like this online.  My plan on how to make the shades wasn't really concrete.  I had ordered yardage based on the size of my windows but I wasn't exactly sure what I was doing.  I bet nobody else does that!!
Here are my ponderings...
I had the pillow ticking fabric, curtain tiebacks that came with the toile draperies and available curtain rods.
 I sewed a pocket on both top and bottom and hemmed the sides.
The ticking fabric was 54" wide.  The small window was 47 1/2" wide, so I made that shade first.  I cut some of the fabric off to save for the big window which measures 65" wide.  Did I mention that I always pray when I make things without a concrete plan?  I definitely appreciate a little divine intervention!

I used the simple (cheap) valance curtain rod on the top and put the black metal rod on the bottom.  Having the round rod on the bottom of the shade allows me to roll it up .  Then I just had to figure out how to hold it in place after rolling it up!!!!
 I tried to reuse the curtain tiebacks but,
which way do I attach them and how?
The shades will probably be up most of the time and only lowered when we have company that would like some privacy or don't want to awaken at first light.  I decided reusing the tiebacks just wasn't going to work.  I made new tie-ups, flat ribbons of fabric, finished 3 inches wide.  I sewed Velcro strips on them to hold the shades at the desired height.  I also added a decorative black button.
This was Plan B.
The ribbon tie-ups, (or whatever you want to call them) are not fastened on so they can be moved or easily adjusted.
The big window.
The small window with the shade rolled up.
The small window with the shade down.
I even had enough fabric left-over to make a new pillowcase.
The French Country Bedroom is now ready for guests.  They can undress in privacy or sleep late if that is their desire.  But, they must remember.......


Glad this project is completed and I'm moving on to the next!
Kandy

Friday, May 24, 2013

Displaying Found Junk On A Patio Wall

You may remember in an earlier post the damage that was done to the roof of our garden shed when Dwight and I took down part of an aspen tree......well the weather has now improved so we decided to repair the damage that we caused.  We replaced a board and the roof shingles.  Fixing all of that meant that we needed to get to the inside walls of the shed, locating nails.  Needless to say, we found it necessary to empty the shed to get to those walls.

As we sorted through 30 years of stuff, I found some "junk" I had forgotten that I had.
It is all "family stuff" that I had hauled back from Oklahoma, knowing some day I would find a place for it.  Here is the saved stuff we uncovered in the shed.....

These are old cistern cups, used to bring water up out of a cistern or well. These were my Grandpa Ray's and had been used on the farm in Okla.
 
A rusty old saw blade and a gear.
                                     
These are a pair of rusty old hames, part of a harness which would have been used with horse drawn farm implements. These were Grandpa's too.
           
This is an old drawer front I found who knows where....... You can not see it but it has the letter "F" stamped on the front.
It will be great to hang BBQ stuff off of the handles, or not!!!

I hung all of this assorted "found junk" on the wall outside on the deck.  I already had the grapevine wreath hanging there, so I just incorporated it all for a unique display.
I bet I can truly say that no one else has a wall quite like ours!
           
I would love to add a pillow to the chair, but the squirrels have been known to destroy things on our deck.  I also need to re-stain the deck later when it gets a little warmer, but decorating this wall inspired me to look forward to spending time out here this summer. 

I want to try planting in the cistern cups, too......I think they would be great for succulent plants, like hens and chicks.  I have one more set of these that I'm saving for Karli.....she might want to do the same thing.  If nothing else, they are great conversation pieces!  Did you know what they were?

Happy Deck Time, Kandy

Wednesday, May 15, 2013

Exterior Trim Replacement and Paint Colors

While preparing to paint the exterior of our house, in addition to removing trees, we determined that most of the cedar trim was in total disrepair. Completely rotted and disintegrating. Awesome.

So we got a few estimates and the work to replace all the trim (including the four column posts on the front porch) begins tomorrow. I'm so excited. Almost as excited as I am for the day the painting will start.

We continue to apologize to neighbors as we see them. One was nice enough to say, "I like the new chairs you have on the front porch. Are you going to replace the shutters?" This makes me laugh a little bit. Thankfully it is almost over.

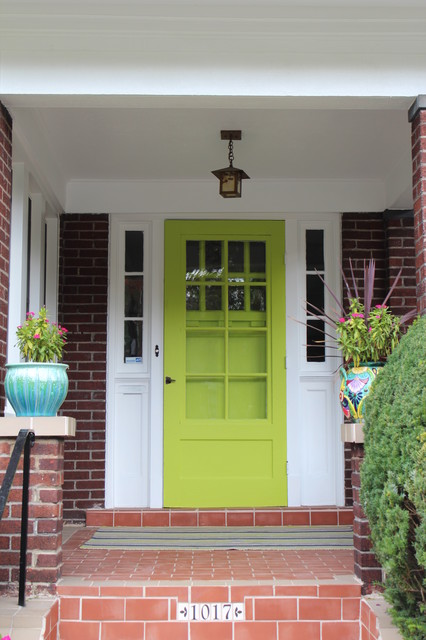
We decided on SW Pewter Tankard as the field color, SW Extra White as our trim color and we're purchasing black vinyl shutters from Home Depot (so we don't have to paint those). And the front door will likely be SW LeapFrog. You can see the original color dilemma post here.
We had a limey green front door at our old house (until the silly HOA decided they didn't like the color). I can't WAIT to have one again! Source
SW6431 Leapfrog

Sherwin Williams Pewter Tankard
And just to add to the fun, we're getting a new sidewalk on Saturday. I'll be sure to take before and after pictures.

Ahh, once that paint is done, I'll be so close to completing one of my New Year's Style Resolutions.

~Karli

Sunday, May 12, 2013

Front Porch Bench from Headboard (Birthday Bench)

Karli actually started this project by finding an old wood headboard, just down the street from where she lives.  It was FREE.  But, before picking it up, she called me and asked whether we could use it.  The answer was, "of course, we can always make something out of it!" 

Well she decided she'd like a bench for her front porch, so Dwight and I hauled the headboard to our house and started to work.  Our plan for the bench consisted of reusing 4 spindle legs that had been Brent's, (they came off of a coffee table he longer wanted when they first got married.)  I had saved them.  Now we'll reuse them on this project and give them back.  Since Karli's birthday just happened, this bench will be the perfect gift.
Here is what we started with.....the FREE headboard and the 4 spindle legs.
                                     
We purchased 1 x 4 pine boards to build the framework and top of the bench seat.  We cut the boards to fit within the dimensions of the 54" headboard and also cut small corner pieces (with 45 degree angles on the ends) to join the frame to the legs.
You can see the angle pieces we cut. A bolt joins the framework to the legs.
The framework with all 4 legs attached.

The headboard then gets attached to the frame and braced.
         
Front view with headboard on.
                                  
We did not want screws showing on the top side of the seat where we attached the boards.  So, we cut square stock, attached them to the framework, then screwed the boards on from underneath.
This shows the underneath side.

Karli wants to add pillows.  Arms were needed on this bench to hold those pillows.  So, we had to get creative.  I drew out 4 different arm ideas.  Finally decided on this one...I cut them out.  Then when Dwight set them on for a trial run, he put them upside down!   We both decided that we liked them that way best.  (Go figure!!!)
Here is the arm creation...upside down.
The bench is ready for primer and paint.

I used Rust-Oleum Painter's Touch, Ultra Cover in Semi Gloss.  I really prefer spray painting, it goes so quickly and the bench will sit outside and I wanted it to be durable.
We nicknamed her BB (Birthday Bench)
Karli hasn't seen it yet since it is still at our place.

Happy Birthday Karli........with love from Mom and Dad.  We'll deliver it soon.  Until then, these pictures will have to do!

Kandy

Happy Mother's Day!

Happy Mother's Day to all you moms out there!

What a blessing it is that I get to share such an amazing bond with my mom. We talk nearly every day, we really are the best of friends and now we get to share in the creation of this blog.

I thank my mom for instilling in me her sense of style amongst other things. She taught me that beauty comes from within, but a good lipstick and some mascara can't hurt. She helped me learn to be confident and humble at the same time. She let me pursue my passions, even if they weren't the same as hers when I was younger. I inherited her curly hair and her height. 

I believe my mom is one of the most beautiful women I've ever met. And I'm thankful for her every day. 

I wish every mother, mother-in-law, grandmother and step mom the best day. I hope you get to spend some time relaxing and doing something you love.


Love to all,
Karli

Thursday, May 2, 2013

A Spring Antique Sale

As some of you may recall, in my former life, I was an Antique Dealer. When the store closed I took my inventory home. I have had one big sale here at home, but, for the most part, I have just been sitting on all that stuff.
I keep my "stuff" in my barn, where I have a showroom set up.

I did a show last weekend, a money-maker for a ladies organization raising funds to offer scholarships. I paid for an 8' space, set up my booth area, sold my antiques and vintage items, and then I donated 10% of my proceeds to the ladies club. It was for a good cause and a fun outing since I haven't been playing with "my antique stuff" for quite a while.

A good friend of mine, who is also an antique dealer, joined me in the venture. She brought her items to add to mine. Then another friend, also a dealer, gave us some of her items to sell as well. It was a joint effort!

We started setting up by creating walls with two sets of shutters.
Love using these to divide areas as well as hanging on.
  
The "girly" side of our booth was the perfect spot for hats and frilly feminine items just right for Mother's Day giftgiving.
Love the black and white

 This is a close-up of an old cabinet door. I painted the center with Chalkboard paint and added vintage hooks.
                        
 A broader view of the "girly" black and white side. You may recognize the chair from an earlier post.
           
The old metal display unit is perfect for hankies and gloves. I used this at the store for several years and people always wanted to buy it.
This metal rack was originally used for candy in General Stores.
You can see more white ironstone on this earlier post.

A closer look at one shelf. We even sold some of the burlap flower magnets. See our post on how to make these.
               
This part of our booth was dedicated to vintage gardening.
A potty chair from the 1950's holds a potted rose plant.
             
Layering on top of the enamel top table with an old wood box allows for more garden items.
Love the pink and green for Spring!
                              
The garden items even filled the floor.
                
It is still early for "real" plants in our area, however the silk ones made everyone think of Spring.
The little potted flowers were just too sweet!
                    
 The little watercan holds my business cards.
              
Would you believe we did not plan to wear similar jackets!
             
The sale was not quite the sucessful day of selling that we were anticipating, but we did have fun planning, hauling, setting up, visiting with customers, tearing down, boxing our stuff back up, and then hauling it all back home. (Really!!!)

That is the way it goes sometimes!     CARRY ON!!!

Happy Spring,
Kandy