Tuesday, January 29, 2013

Kitchen Overflow...Organizing My Pantry and Cookbooks

I swore I'd organize all the miscellaneous stuff that had been shoved in our dining room hutch and kitchen pantry shortly after we moved. Fast forward 11 months and I finally did it!

My old house was lacking good storage for "paperwork" so I'd gotten in the (bad) habit of putting items like taxes, instruction manuals, old photos, etc. in the lower part of my hutch. That wasn't really a problem until I got married and received a ton of kitchen goodies. The overflow of cheese knives, tupperware, cake plates, and serving pieces had been relegated to boxes in the garage or basement. What a shame!

So this weekend I set out with a mission:
  1. Move the paperwork and office junk to the office (what a concept, right?!) from the hutch
  2. Move the cookbooks off the pantry shelf into the new-found hutch space
  3. Move less frequently used kitchen items to additional new-found space in the hutch (I seriously had a LOT of junk in that thing!)
  4. Clean out the pantry
  5. Cover the pantry shelves in new contact paper
  6. Re-organize the pantry
  7. Do a happy dance
I wish I had taken a "before" picture of the mess that was in the hutch. I think I was too embarrassed. Here are a few of the "before" pantry pics:

Here's the pantry door with one of my favorite old reinvented pieces (it was a tea tray that Mom turned into a chalkboard!)

And here's the messy disorganized contents. I'd already moved a couple things to the bottom shelf where all the cookbooks had been shoved.
At this point, it was time to empty out EVERYTHING so I could see what I really had in stock as well as clean the shelves and re-cover the lovely yellow.

Here you can see it all empty--ahh, the yellow!
 
Everything that had been in the pantry
I took all the shelves out and recovered them in a graphic gray and white chevron.


Then it was time to reorganize all the contents. I put all the cereals and breakfast goodies on the top shelf. The next shelf is full of grains (rice, pasta, barley, etc). The next and easiest shelf to access is filled with snack foods like almonds, granola bars, and crackers. The fourth shelf holds the items that I don't need to access frequently like breadcrumbs, pancake mix, bread mixes, etc. I was also able to carve out some space here for water bottles that had been clogging up space with our glasses. And the bottom shelf now holds all of Porter's goodies like bones, peanut butter, green beans, etc.

The door unit holds canned goods, back stock of items like ketchup, dried fruits, etc. It makes me happy to be able to see what I've got and know which shelf holds the items I'm looking for!


Ta-da!
  
And for good measure I added this week's menu on the board as a finishing touch.
I know you're really curious to know how the dining room hutch looks now that it's organized. Here you go:

It's a work in progress, but at least all my cookbooks are in one, easy-to-see place now. (Don't mind the frames leaning on the side and stuff on top--that's for another day)
 
I love this old hutch. Mom found this for me years ago. We took out the screens that were in the doors.
 
And finally, the lower portion holds overflow kitchen items like paper goods, tupperware, tins and cake plates.
 I can't forget the real final step: the happy dance! I love organization.

~Karli

Saturday, January 26, 2013

Thrift Store Buffet Turns into Entertainment Center

Karli and Brent needed a home for their big screen TV, but not anything boring or the usual entertainment center from a "big box store." I found the perfect piece at a Thrift Store in town. It was an antique buffet c. 1930's -1940's. It did have some real problems and the finish was beyond horrible, but it had style and the price was right...$25.00. The clerk informed me that it was marked so cheap because "it was haunted" and they wanted it out of the store! I told her I was not afraid of it...I would probably be praying the entire time I refinished it, anyway.

Here is the "Haunted Buffet." It doesn't look too scary, does it?


It definitely had issues with the doors. Someone had tried to repair them with wood putty, but I was planning to remove them anyway. In fact I didn't even need the drawers since the Karli and Brent would be using that area to store the electronics. I sanded the piece and added a floor to one drawer area. I then spray painted the buffet with Krylon Flat Black (2 coats), distressed it with a sanding sponge, dusted it well, and finished with Minwax Spray Polyurathane in Semi Gloss (2 coats.)


The finished beauty! (You can also see Karli's ladder for blankets in this picture. Learn more about that here)

An up-close of the drawer floor I added

Here you can see that I painted the inside since the doors were removed.
  I proudly delivered it to Brent and Karli. "Look what Mom brought you...a stylish entertainment center that is supposedly haunted."  Now, Karli takes over with the rest of the story.

"We really love using this as our entertainment center. It houses all the components as well as magazines and some baskets for more junk. We often joke with people that it's haunted. It is all fun and games until we hear someone walking around in the bedroom above the family room (when we're all downstairs). Eerie, right?"  

~Kandy


Friday, January 25, 2013

What New Curtains Can Do for a Room

I've been replacing all the orginal drapes and window coverings throughout our house. The former "silk" drapes had turned yellow over time, the cream aluminum blinds weren't hanging straight and the stained pull down shades had seen a better day.

All of the pinch-pleated curtains and drapes had been hung on traverse rods with hooks...at least a foot or so from the ceiling. Some of them stopped at the window apron or a foot above the floor. Weird...just weird.

Mom tried to convince me to keep some of the drapes and the rods (or at least try to only replace the drapes). That became a time-suck if I've ever witnessed one. Pinch-pleated drapes are few and far between nowadays and if you do find them, they're terribly expensive.

So I basically took down all the rods and drapes, patched the holes and started fresh. I can proudly say that ALL of the former window coverings and their hardware are now out of our house!!

This was one of my final window projects--the family room.  

I don't know what those little blurry circles are on my camera. Annoying!

Porter decided he really wanted in on the picture action.
These were the least offensive of all the drapes, so we'd lived with them for about a year. They had a "nice texture" and they hadn't yellowed like the other materials. But the fact that they were hung so low bugged me since this room already felt like it had low ceilings.


This sort of shows the texture
I also thought they smelled funny. Maybe I was the only one.

I completed this transformation for about $83. In my eyes, for a window this large, that is a steal! I purchased the drapes from IKEA at $24 for a pair. I had to buy two pairs since the window is so wide. I found the beautiful rod that stretches to 144 inches at Home Depot for $35.


Hanging the drapes as high and wide as I could lets more light into the north facing room and visually makes the room look taller. I also love that it brought more white into the room. It feels crisp, clean and fresh now.
  
Before

After
~Karli

Wednesday, January 23, 2013

From Trash to Treasure...Salvaged Closet Becomes Entertainment Armoire

I don't know if I am all alone out there, but, I really don't like the T.V., speakers and electronics to be the main focal point of my living room. Of course, it is "in style" now to have the big screen exposed and husbands are especially proud to show theirs off!!!  Nevertheless, I prefer all of that stuff to be hidden away. You see, my husband plays an electric bass guitar (was in a rock band in a previous life) and has a large bass amplifer as well as speakers and an assortment of components. 

The above reasons lead me on a search for the perfect, huge entertainment center which could accomodate and conceal all of the pre-mentioned items. For years I searched but to no avail. I knew with my husband's help we could probably build it, but I really wanted something older with character. Finally I found what I believed to be the perfect piece...an old beadboard closet salvaged from the dump. It was outside leaning against the wall of an Antique Store. It had great bones, great crown moulding on the top, and the right measurements to accomodate all that stuff. It came out of a home in the area, probably around the 1920's. I knew we could make it work...we only had to "tweak" on it.

It was a closet, made of fir beadboard and had a center support, a rod inside and two doors. It was a little wobbly but we were able to remove the center support and widen one door by adding a piece of wood trim so the doors would meet. We replaced the hinges and added old door knobs and plates.

I don't have a before picture. I wasn't thinking about ever wanting to see it in that shape again, but this shows the hinges and old door knobs we added.


We also added square wood feet that I ordered from VanDykes Catalog. We built shelves to accomodate the components, amp and speakers and made drawers to house the CD collection.

Just look at all this storage....


We made drawers to house the CD collection.


Since the closet had never been painted, refinishing was a snap...after sanding and cleaning the old wood I applied a coat of Briwax in Tudor BrownWith the doors closed, the old closet gives you no clue as to what it holds.


Getting this huge beast up stairs to our living room was no small feat (we had to get the help of two strong male friends, plus me and hubby). After all the trouble, we decided this piece will never leave...it will be sold with the house.

This project just shows what thinking outside the box (or closet) can get you!!!

~Kandy

Saturday, January 19, 2013

Choosing Exterior Paint...Eenie, Meenie, Miney, Mo

I feel like I start every blog post this way. "When we first saw our house we knew we would need to..."

Repaint the exterior because:
  1. We hated the colors
  2. The darker rust color was chipping and peeling
  3. I love bright/impactful doors and this scheme didn't lend itself to that
  4. Did I mention we hated the colors?
So I've been looking at color swatches for almost a year and I'm more confused than ever. What's it's going to boil down to is buying sample containers and just getting some of it on the house. Adding to the craziness we have going on right at the moment...

Don't mind the trash cans
 
Here's an up close of the mess
Yes, I'm embarrassed that my house is in this state, but I publicly apologized on Facebook, so I'm forgiven, right? When they put the new windows in, they took off the old rotten rust trim and replaced with beautiful new wide white trim. But you can't see that in this picture. All you can see here is chaos.

The shutters were taken down to install the windows...they were rotted and we decided to just leave them off. Apparently, the house was a different color where the shutters had been. Awesome. We have a house with like four colors going on. I can't wait for the weather to warm up so we can fix this! 

So on to the fun stuff. I know I want white trim and black shutters. I think I've narrowed those two choices down, but it will really depend on the main color I choose. The main color will need to go well with the roof and the brick.  

Sherwin Williams Tricorn Black for the shutters
SW7004 Snowbound
Sherwin Williams Snowbound for the trim--this is showing up a little bit gray here. Its just one shade off SW Pure White, which I used on the trim at my old house.

Here are some of the main colors I'm contemplating. I want something that reads gray at times and tan/khaki at other times. 

SW Pewter Tankard

SW Backdrop

SW Morris Room Gray

SW Dovetail--this is the color we painted our old house. Do I want to repeat?

Today I think I'm leaning towards Pewter Tankard. What do you think? Do you have a preference?

~Karli

Friday, January 18, 2013

Family Room Blanket Storage

I saw this idea on Pinterest and knew I had to do it in our family room. We have quite a bit of black furniture in the room, so I started by looking for ladders that had a "used" look.

Brent and I took a stroll through downtown Littleton one afternoon and found a great antique store with several old painter's ladders. I didn't need the 12 foot length since our ceilings are only 8 feet. The owner agreed to cut it down to the size I needed.

We got it home and I gave it a little sanding on the really rough spots so it wouldn't snag the blankets. I left all the paint drips and raw wood. Then it went in the house and the blankets were hung. Viola! Easy.

Our fun blankets are easy to access and displayed prominently now. I love how the ladder draws the eye up in the room since it almost reaches the ceiling.

~Karli

Thursday, January 17, 2013

Karli's Guest Bathroom Makeover

I posted about getting new windows earlier and I'm already loving the efficiency and warmth (along with the crisp white vinyl) they're providing. But on to the dilemma they also present...


When we decided to replace the window in the guest bath shower, we knew that would mean that the tiles would be impacted. Here's a look at the bathroom from the previous owner...


Not much was necessary right when we moved in since everything was in fairly good condition. (Don't get me wrong, there are things I really despise about the room--like the countertop/sink combo, the builder grade mirror and lights and the ugly old medicine cabinet--but its completely functional.) So basically all that had been done was a fresh coat of white paint and hardware on the cabinet, a new white shower curtain, new cozy khaki runner and some countertop accessories.

In this picture you can see the room without all the accessories I just mentioned. A blank slate for the most part. Oh I almost forgot about the lovely towel bars, which you can see here too.

Here's the current shower tile, complete with special markings from previous little artists.


And the shower/bath fixtures--I'm sure many of you have or previously had beauties like these!


Here's the mirror/light/medicine cabinet area that I dislike so much.


And my real excuse for starting this project now...the damage created when the new window went in.


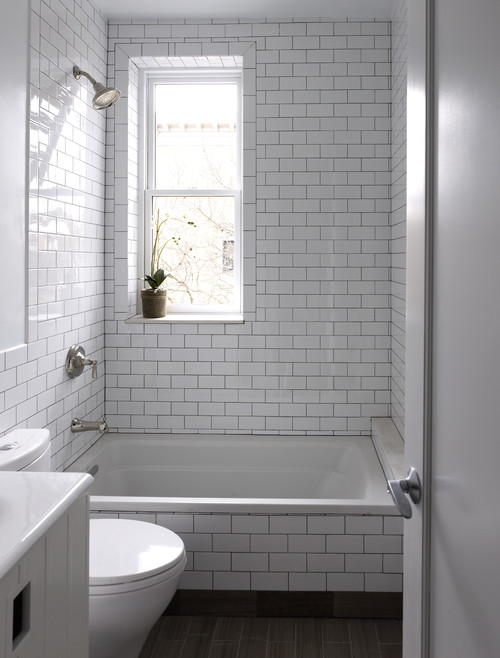
Here are some of my inspirations for the space.


I've decided on white subway tile, but I'm going to use a light gray grout. White grout is hard to keep clean and the gray grout will provide a nice bit of contrast to a fairly white room.  I'm leaving the tub as is (cost)....and it's in good shape but I'm going to tile all the way up to the ceiling around it.

Eventually I'll get to the mirror, light fixture and medicine cabinet area.

What do you think of white tile with darker grout? I'm loving it!

~Karli

Wednesday, January 16, 2013

Some of My Favorite Vintage Chairs

I adore Vintage Chairs..... every room can probably use at least one. They can readily be found at flea markets and garage sales and usually do not demand a large amount of $$$$$ (dollars) if you only need one. You can easily transform a chair to work in your room. Have fun with the finish and fabric, mix it up and make a statement. Here are some things I consider before starting any project with a vintage chair:
  1. It only needs to be somewhat comfortable unless you're planning to spend hours sitting in it. I suggest you sit in it and judge for yourself.  
  2. Make sure the joints are tight, not wobbly. It can be reglued, but unless you have a large collection of clamps, you may have to pay a pro to do it.
  3. Make sure it is worthy of the time and money you may put into it. Fabric, foam, nailheads, paint, (not to mention time) can add up to a large investment.   
Here are some of my projects which have become some of my favorites:

I painted this one white and covered the seat in khaki checked fabric.

I painted this chair black but had it professionally upholstered
with a great leopard fabric from Hobby Lobby.
                                                             
Refinished oak with leafy print fabric seat.

Vanity stool with black and white ticking seat.

Refinished oak rocker with new chenille seat.

Refinished oak again (love that arts and crafts style oak)

Black paint and fun ribbons added to cover reglued spindles.
Have you given any of your old chairs a new life?

~Kandy